PCにNvidia Graphicsカードがインストールされているユーザーは、Nvidiaコントロールパネルを使用して、特定のグラフィック設定を微調整するオプションを常に利用できます。ただし、Nvidiaコントロールパネルが見つからない場所に問題が発生する場合がありますが、これは間違いなく問題です。
コントロールパネルに戻るにはいくつかの方法がありますが、これらのソリューションの一部は長く複雑に見える場合があります。どちらの場合も、問題を解決するための解決策を見つけるために、記事の残りの部分をたどる必要があります。
方法1. Nvidiaドライバーを再インストールする
この解決策は、コントロールパネルに関する同じ問題に苦しんでいるユーザーに提案されました。サポートセンターが提案するいくつかのソリューションと同じくらい一般的ですが、これは本当に問題をすぐに解決しましたが、追跡するにはやや時間がかかります。幸運を!
- まず、次の手順に従ってセーフモードで起動する必要があります。Windowsキー+ Iキーの組み合わせを使用して[設定]を開くか、[スタート]メニューをクリックして左下の歯車キーをクリックします。

- [更新とセキュリティ] >> [リカバリ]をクリックし、[高度なスタートアップ]セクションの[今すぐ再起動]オプションをクリックします。PCが再起動し、オプションの選択画面が表示されます。
- PCをセーフモードで起動するには、数字の4キーまたはF4をクリックします。
次に、ハードディスク上のNvidiaフォルダーを削除し、ドライバーをアンインストールする必要があります。
- Navigate to your local hard disk by clicking on This PC >> Local DiskC. You should be able to see the NVIDIA folder right there. Right-click on it and choose Delete.


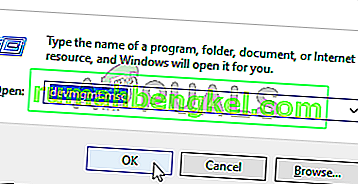
- Click Start and type Run. Select Run, A Run dialog box will appear.
- Type “devmgmt.msc” in the run box and click OK button. This is to open Device Manager Window.
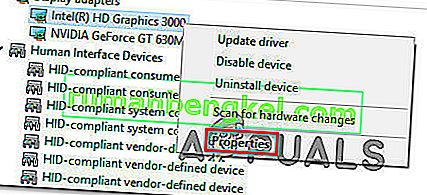
- Expand the “Display Adapters” field. This will list all network adapters that the machine has installed. Right-click on the Nvidia adapter you want to uninstall and select “Uninstall”. This will remove the adapter from the list and uninstall the device.

- Click “OK” when prompted to uninstall the device. This will remove the adapter from the list and uninstall the driver.
Now, you will need to reboot into normal mode and download the latest Nvidia driver available online. You can check the list on their official website. Also, make sure to uninstall Geforce Experience before going ahead.
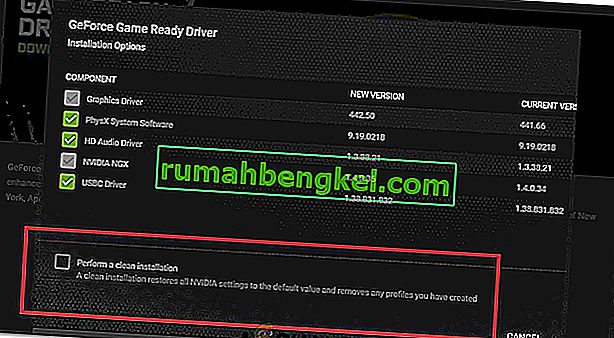
- Run the setup file you just downloaded and follow the instructions which appear on the screen. Choose the Custom installation option and check all the boxes in the custom install options windows. Also, check the box which states “perform clean install”.
- Restart your computer and check to see if the Nvidia Control Panel is back.
- If it still isn’t back, repeat the process again, use DDU to uninstall your drivers but this time, download an older version of the driver and try installing it on your computer.
- Sometimes, older versions fix bugs that are present in newer versions.

Method 2. Restart Nvidia Services
Services are the backbone of each program and restarting them is the usual method of solving any issues related to them. If Nvidia services have gone corrupt, restarting them is almost sure to solve the problem no matter what caused the issue in the first place.
- If you are using a version of Windows older than Windows 10, the easiest way for you to access the services running on your PC is clicking on the Start button and navigating to the Run dialog box.
- Type “services.msc” in the dialog box and wait for the list of services to open.

- If you are using Windows 10, you can also access Services by using the Ctrl + Shift + Esc key combination in order to bring up Task Manager.
- Navigate to the Services tab in Task Manager and click on Open Services at the bottom of its windows, next to the gears icon.
After you have successfully open Services, follow the instructions below.
- Locate the Nvidia services by clicking on the Name column in order to sort the services in alphabetical order. Repeat the same process for the processes which contain the work Nvidia.
- Right-click on the service and click on Properties.

- Navigate to the Startup type and set it to Automatic if it’s not set already. Click the Stop button in order to stop the service and wait for a minute. Click on Start after a while and confirm the dialog boxes which may appear.
- Check to see if the issue with the Control Panel is gone.
Note: Repeat this process for all Nvidia Services in the list.
Method 3. Open the Control Panel Process Manually
If the process fails to launch automatically when you want it to, the issue may be with the fact that something regarding the automatic launch is misconfigured and it simply won’t open on its own. You can force it to launch by following the steps below:
- Use the Ctrl + Shift + Esc key combination in order to open the Task Manager. Click on More details if the window is shrunk and locate the Nvidia Container entry on the list. Right-click on it and choose the Open File Location option.

- While you are in the folder of Nvidia, go Up one folder until you end up in the Nvidia Corporation Folder. Try to locate the folder named Control Panel Client, open it, and look for the application called nvcplui.exe.

- Right-click on it and choose the Run as administrator option. The problem should be solved now.
Method 4. Stop Overclocking Your GPU
Overclocking your GPU usually causes these errors. Overclocking is a process where you change the frequency and speed of your processor to greater value and above the factory settings. This can give your PC a significant speed boost but you have to be absolutely careful since there were occasions where entire PCs went down in flames after users overclocked them too much or because they were careless.
Returning your GPU’s rate and frequency to its original state depends on which software you used to overclock in the first place. AMD and Nvidia have their own applications available to download which lets users overclock their GPU but there are dozens of programs available to choose from.
Stop overclocking your graphics card and check to see if Control Panel reappears.If it does, you can try to safely overclock again but be careful not to do too much.
Method 5: Update GPU Drivers
In some cases, the Graphics Card Drivers might have gotten outdated due to which a bug arises over time and the Nvidia Control Panel is unable to open up properly. Therefore, in this step, we will be launching into the device manager and check for any device drivers available from the Windows Update. For that:
- Press “Windows” + “R” to open the Run prompt.
- Type in “devmgmt.msc” and press “enter”.
- Expand the “Display Adapter” tab and right-click on the Nvidia Driver.
- Click on “Properties” and select the “Driver” tab from the top.
- Click on the “Update Driver” button and wait for the updater to process.
- Follow the on-screen instructions and check to see if the issue persists.


Method 6: Get it from Windows Store
There has been a bit of a controversy regarding the Nvidia Control Panel and some users have stated that they need to download and install the Nvidia Control panel separately from the Windows Store. Therefore, it is recommended that you use this link to navigate to the Store and then download and install the Control Panel from there.
If the Control Panel is There But Missing from the Desktop Context Menu
Some users claim that they are able to find the Nvidia Control Panel in the regular Control Panel but they which to have it available in the context menu which appears when they right-click on their Desktop. This is a much easier way to access this option so follow the instructions below in order to achieve this.
- Use the Windows Key + R key combination in order to open the Run dialog box or simply search for “Run” in the Start menu.

- Type “control panel” in the Run dialog box and press Enter on your keyboard. This will open Control Panel immediately. At the top right part of the windows, change the View by option to large icons.
- Locate the NVIDIA Control Panel entry, click it, and the NVIDIA Control Panel should open right away. Click on View or Desktop and check the option which says Add Desktop Context Menu.

- Apply the changes you have made, navigate to your desktop, and check to see if the Control Panel appears in the context menu once again.
If NVIDIA Control Panel won’t launch
One of the users on Nvidia’s official forum spotted a possible solution for the nvidia control panel not opening, tried it out, and he turned out to be successful. The solution is short but it involves some advanced actions which you should perform carefully.
- Navigate to the following address
"C:\Program Files\NVIDIA Corporation\Display.NvContainer"
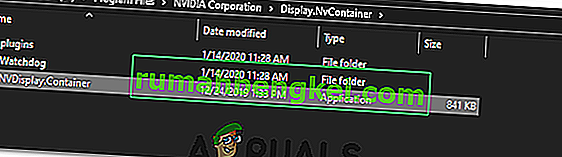
- After that, right-click on the “NVDisplay.Container.exe” file and select Copy from the context menu.
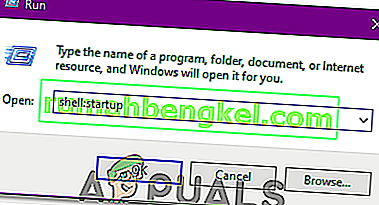
- Use the Windows Key + R key combination in order to open the Run dialog box or simply search for “Run” in the Start menu. Type in “shell:startup” in the dialog box and click Enter.
- It should the open “C:\Users\naoda\AppData\Roaming\Microsoft\Windows\Start Menu\Programs\Startup” folder. Paste the “NVDisplay.Container.exe” as a shortcut in this folder.
- Finally, right-click on “NVDisplay.Container.exe” shortcut you just made, go to Properties, and navigate to the Shortcut tab. In the Shortcut Tab go to Advanced and check the “Runas Administrator” option. Confirm the changes, navigate to the Compatibility tab and check “Run This Program as Administrator”. Click on Apply and then OK, and check to see if the problem is solved.