Steamクラウドは、リモートストレージシステムにゲームデータを保存する簡単で透過的な方法を提供します。Auto-Cloud構成で指定されたファイル、またはディスクに書き込まれたファイルは、ゲームが存在した後、(Cloud APIを使用して)Steamクラウドサーバーに自動的に複製されます。

これは、ユーザーがコンピューターを変更した場合に特に便利です。ゲームの進行状況は、クラウドAPIまたはディスクから直接読み取ることによって再開されます。Steam資格情報をすでに入力しているので、ゲームが起動する前にファイルが自動的にダウンロードされます。Steamクラウドの主な仕事は、ユーザーが使用しているすべてのコンピューター間ですべてのファイルが確実に同期されるようにすることです。
ユーザーは、クライアントのSteam設定にあるクラウド同期全体を無効にするオプションがあります。ユーザーは、ゲームごとにクラウド同期を無効にする柔軟性もあります。しかし、ソリューションに進む前に、Steamクライアントを最新のビルドに更新します。
Steamクラウドを利用する異なる方法は何ですか?
Steamは、Steamクラウドを利用する2つの異なる方法を提供します。
まず、Steam Cloud APIです。クラウドAPIは、Steamクラウドをゲームに直接統合できる一連の関数を提供します。クラウドAPIは、個々のSteamユーザーファイルを互いに分離するタスクも実行し、Steamクラウド全体をより適切に制御します。
2つ目はSteam Auto-Cloudです。この機能は、主にCloud APIを使用するのが難しいレガシーゲーム用に設計されました。これは、Steamクラウドを開始するための迅速な方法ですが、SteamクラウドAPIが提供する柔軟性と能力に欠けています。
開発者は、Steam Auto-Cloudの代わりにCloud APIを使用することをお勧めします。CloudAPIは、より深く効果的な統合とカスタマイズを提供します。Steamクラウドを最大限に活用することができます。
Steamクラウドの競合を解決するにはどうすればよいですか?
Steamクラウドの競合は、Steamクラウドのコンテンツがハードドライブに保存されているローカルゲームファイルと一致しない場合に発生します。これは、そのときに使用していたマシンで発生するか、以前に別のマシンで発生した可能性があります。ファイルは2つの異なる場所で変更されたため、それらの間の同期は行われなかったため、Steamは保持するファイルを決定できません。

ほとんどの場合、最後に変更されたファイルを選択します。ゲームの最新の開発が保存されることを意味します。ウィンドウでプレビューされたデータを注意深く検査する必要があります。コンテキストの日付と時刻を注意深く確認し、Steamで最後にゲームをプレイした時刻にこれを対応させます。このコンテキストは、保持するバージョンを決定するのに役立ちます。
オフラインモードでゲームをプレイすると、ゲームが同期されなくなることに注意してください。これが、Steamクラウドの競合の最も考えられる原因です。
Steamがファイルをクラウドに同期できない場合はどうなりますか?
このエラーは、SteamがローカルファイルをSteamクラウドと同期できなかったことを示します。Steamクラウドサーバーが直面している一時的な問題である可能性があります。SteamウェブサイトからSteamクラウドのステータスをチェックして、問題が彼らの側にあることを確認できます。

Steamクラウドサービスが完全に稼働している場合、問題はあなたにあります。Steam接続を確認して問題をトラブルシューティングできます。Steamクラウドとの同期に問題があるかどうかを確認することもできます。
メッセージを無視して[ゲームをプレイ]をクリックすると、ローカルファイルとSteamクラウドの間で競合が発生する可能性があります。また、進行状況やゲームデータが失われる可能性もあります。
別のコンピューターに移動した後、ファイルまたは進行状況が失われた場合はどうなりますか?
最新の進捗状況を見逃していて、ゲームが設定を使用してSteamクラウドを使用していることを再確認した場合、Steamがデータを正常に同期できなかったか、同期の結果、以前のデータが雲。
元のファイルまたは進行状況がまだ古いマシン上にあり、同期できなかった可能性があります。そのコンピュータでSteamを起動すると、進捗状況が表示されます。サポートしている場合、Steamアカウントに接続されている他のすべてのマシンで自動的に更新されます。
また、多くのゲームはSteamクラウドの機能を使用していません。Steamクラウドのサポートが利用可能であれば、ゲームの公式ページを確認できます。そうでなく、古いマシンにアクセスできない場合、それは進行状況が失われ、それを回復する方法がないことを意味します。
Steamクラウドサーバーに保存されているファイルを削除する方法は?
Steamクラウドは、ゲームの各進行状況をバックアップするために使用されるため、他のコンピューターからゲームにアクセスしても、進行状況を失うことはありません。進行状況がクラウドに保存されていることは、次の方法で確認できます。
ゲームがバックアップされているかどうかを確認します。
- Steamクライアントを開きます。ウィンドウの左上にあるSteamボタンを押してオプションを選択し、設定を開きます。
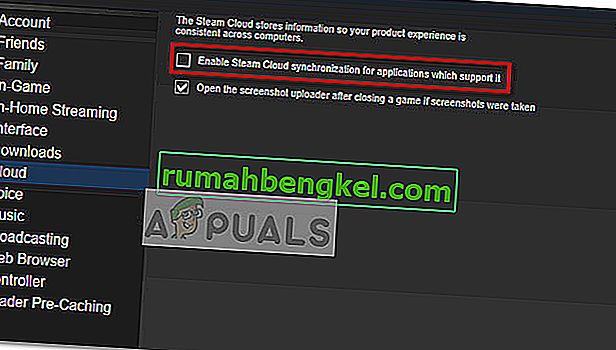
- 画面の左側にある[クラウド]タブを開きます。「それをサポートするアプリケーションに対してSteamクラウド同期を有効にする」オプションがチェックされているかどうかを確認します。
- 次に、Steamクライアントの上部にある[ライブラリ]タブをクリックします。ここにすべてのゲームがリストされます。
- ゲームを右クリックして[ プロパティ ] を選択します。次に、ウィンドウの上部にある[ 更新 ]タブに移動します。
- ここでウィンドウの下部に、[[ゲーム名]のSteamクラウド同期を有効にする]オプションが表示されます。オプションがオンになっていることを確認します。


両方のオプションが有効になっている場合、それはあなたのゲームがSteamクラウドによってバックアップされていることを意味し、データを削除することもできます。
バックアップメカニズムとは何ですか?
最初に知っておくべきことは、保存されたゲームデータには3つのバージョンがあることです。
- 元のバージョンはAppData(D1)のフォルダーに保存されます。
- クラウドバージョンは、Steam / userdata / SteamID / AppID(D2)に保存されています。
- Steamのクラウドサーバーに保存されているクラウドバージョン(D3)。
私たちが使用したアノテーション(D1、D2、D3)は、後でそれらを頻繁に参照するため、注意してください。
When you start the game for the first time, D1 is created automatically. After you are done playing the game, the game data is updated in D1 and automatically copied to D2. After this D2 is then synced to D3, thus uploading all of your game content.
If you start your game from another computer for the first time, if Steam has D3 on its servers but doesn’t detect D2 on the computer, it will automatically download the data and copy D3 to D2. Steam Cloud also automatically downloads the missing data whenever you start Steam.
In a nutshell, the most important data for us is D2. If we can manipulate it, we can successfully delete the data which you want to delete.
Note: Some games don’t have D1 and they directly save their data to D2. While some games don’t use D2 as a medium and upload the data to the Cloud directly from D1.
What Are the Userdata Contents?
In the directory Steam/userdata, you should have a folder corresponding to your SteamID (You check what your Steam ID is by reading our article on it). After you open it, there will folders made for each game that you play. They will be identified using their AppID (AppID can be easily checked by visiting the game in the Steam store and extracting it from the URL). In this game folder, you will find two entities.
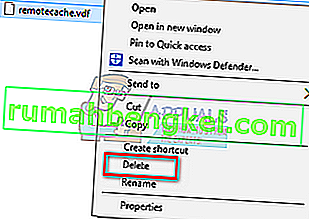
- remotecache.vdf: This file describes all the properties of files that are contained in the remote folder.
- Remotefolder. This contains all the files which are synced with your Steam Cloud server.
Deleting Data from Cloud
In this method, we will be following two important steps. We will first bring up the Steam Cloud conflict notification and then delete the Cloud files.
Do note that you would have to follow these steps game by game to delete all of the Steam cloud content.
First, we need to delete the AppID folder from your Steam directory. After you restart your computer and Steam, Steam will automatically re-create the folder. We need to perform this step to ensure that the Steam Cloud is working perfectly and we can go ahead with the part of deletion.
- Open your Steam directory. The default location for your Steam installation is
C:\Program Files (x86)\Steam
- Search for a folder of AppID and Delete it. Then restart your computer and Steam. Start a game for a few minutes. Make sure that you have a working internet connection.
- Navigate back to the Steam directory and check if the AppID folder is back. If it is, it is confirmed that your Steam Cloud is working perfectly and we can proceed with the method.
Bringing Up Steam Cloud Conflict Dialogue
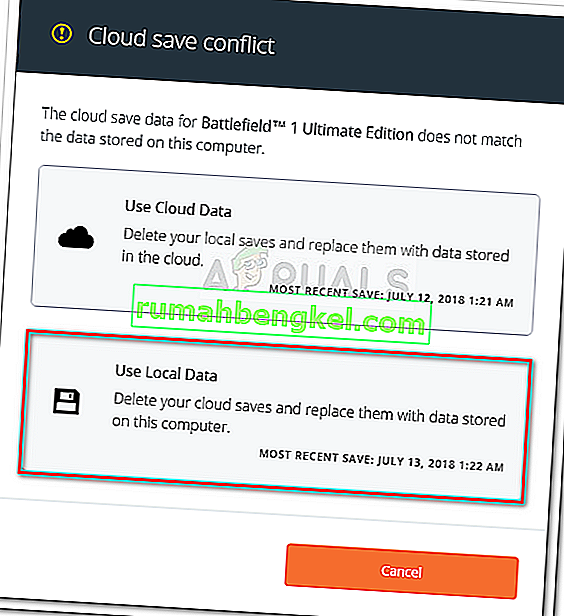
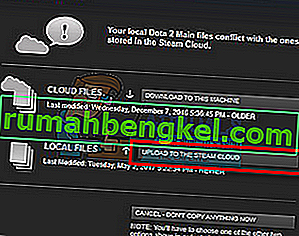
The first part of the solution is probably the most difficult. To delete all your Steam Cloud data, it is necessary to bring the conflict dialogue. Without it is not possible to delete the data present in your Cloud. Steam Cloud conflict occurs when the Cloud files differ from the data present on your hard drive.
There are two methods to bring about this conflict:
Method 1:
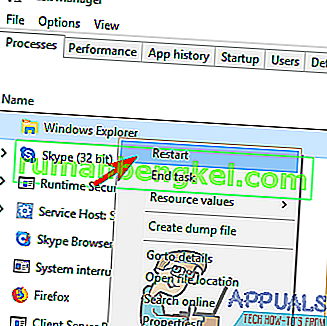
- Make sure that your Steam Cloud is enabled by following the steps mentioned above. Exit Steam completely by ending all the processes starting with Steamclientbootstrapper using the task manager.
- Now will alter all the files in the location
Steam\userdata\SteamID\AppID\remote
The objective is to make sure that all the files are different from those uploaded to the Steam cloud. We can’t simply delete the files from this location as Steam will automatically notice that the files are missing and download the same ones from the Cloud servers. We can achieve our task by corrupting them and making them 0-byte files.
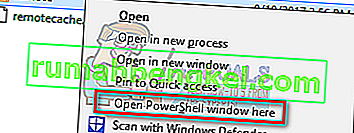
- Navigate to
Steam\userdata\SteamID\AppID\remote
- Now hold shift and right-click on your remote folder. Select the option “Open PowerShell window here”.
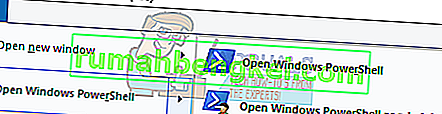
- You can also open PowerShell when in the folder by clicking the File option present at the top left side of the screen and selecting “Open Windows PowerShell as administrator”.
- Once PowerShell is opened, type the exact text written below


clc –path “C:\Program Files (x86)\Steam\userdata\SteamID\AppID\remote\*"
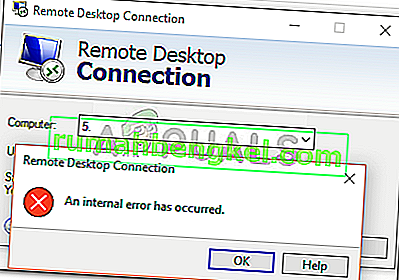
If you fail to write the correct code, you will get an error like this

If you correctly type in the line there will be no confirmatory message and you will get a window like this.

Start your Steam and there will be the conflict windows present on your Steam client.
Method 2:
This is an easier method as compared to the earlier one but it isn’t that efficient.
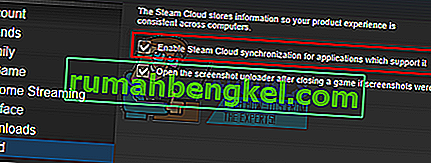
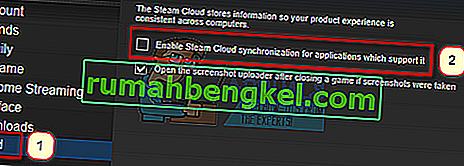
- Open your Steam client. Open its Settings by pressing the Steam button present at the top left corner of the window and selecting the option.
- Open the Cloud tab present on the left side of the screen. Uncheck the option “Enable Steam Cloud synchronization for the applications which support it”.
- Now navigate to your Stream directory as you did earlier and delete all files present in the folder of AppID. The file path for deletion is
Steam\userdata\SteamID\AppID.
- Now start the game to make new and different files in the file location.
- Exit the game and Steam completely by ending all Steam processes in the task manager (end steamclientbootstrapper first).
- Now delete the remotecache.vdf file present in the location
Steam\userdata\SteamID\AppID
- Start your Steam.
- Head over to the client’s Settings and enable the cloud.

Now a Steam conflict dialogue will come forth and we can proceed with the remaining method.
Deleting Cloud files
Once the Cloud conflict error is forth, don’t click any option and follow the instructions below.
- Navigate to the following file path
Steam\userdata\SteamID\AppID
and delete all the files in it. There will be two files (remote folder and remotecache.vdf). Delete both of them.
- Now go back to the conflict window and select the option of “Upload to the Steam Cloud”. Now Steam will sync your AppID folder while there will be nothing in it and the previous data on your Steam Cloud will be deleted.
- Now the game will start automatically but it will create new files that will be synced to your Steam cloud when you close it. We can prevent it from happening by pressing alt + tab. This will open the open windows on your screen. Select the Steam client from the list of windows.

- Once you are in the Steam client, open the client’s Settings. Navigate to the Cloud tab and uncheck the line which enables cloud.

- Now return to the game and exit. No files will be synced to your Steam cloud.
- Exit Steam and delete the AppID folder as we did before.


How to Make Sure If it Worked?
Remember how we checked at the beginning of this method if the Steam Cloud was running as expected by deleting the AppID folder and checking if it was made again. If there is no file present in the Steam cloud, there will be no file downloaded to your computer.
- Enable the Steam cloud as we did in the guide.
- Exit Steam completely by using the task manager.
- Delete the AppID folder (if you didn’t in step 2).
- Now check D3 (these are the cloud files) and compare them with D2 (local files on your computer). If there is nothing in D3, there will be nothing in D2 too!
- Check the following directory Steam\userdata\SteamID
No new AppID folder would have been created.
You can also check by logging Steam in on another computer and checking if the files exist.
If you make it till here without any problems, you have successfully deleted all the files on your Steam Cloud.
How to Delete Steam Cloud Saves from OS X
The procedures above can also be replicated on OS X and older Macs to a slight extent. By following the steps below, you will be able to delete your local saves. You can then disable the Steam Cloud synchronization from the Steam application, start a new game and create a few new saves. Then, when you return to re-enable the Steam Cloud synchronization features, the client will ask you which saves do you want to use. You can then choose the new ones which will delete and replace your old saves from the cloud.
To make things even clearer, here’s a step-by-step guide through the whole thing:
- Open your Steam application and go to Steam > Settings via the ribbon at the top of the window.
- In the settings menu, click on the Cloud tab and uncheck the box associated with Enable Steam Cloud synchronization for applications that support it.
- Close Steam completely and open your Finder app.
- Go to Library > Application Support > Steam > SteamApps > Common and open the folder of whichever game you want to delete the save files.
- Next, open the SAVE folder to reveal the saves of the game.
Note: If the location specified above doesn’t land you to the save files, try the following locations but mind the placeholders:
Users / *Your username* /Library / Application Support / *Game Folder* / Game Documents / *Game* / GameSaves Users/ *Your username* / Library / Application Support / Steam / userdata / *GameNumber* / remote Users/ *Your username* / Library / Containers / *Game Folder* / Data /Library / Application Support / *Game* / GameDocuments / *Game* / gamesaves
- Once you manage to identify and delete the local saves from the game you’re targeting, open the Game and create a few new saves.
- Exit the game, open steam and return to Steam > Settings > Cloud. From the cloud tab, re-enable the checkbox next to Enable Steam Cloud synchronization for applications which support it and click the OK button below.
- Steam will ask you whether you want to use the newly created local saves or the ones that you already have on the cloud. Choosing to use the new ones will delete the old saves that you currently have on Steam Cloud.