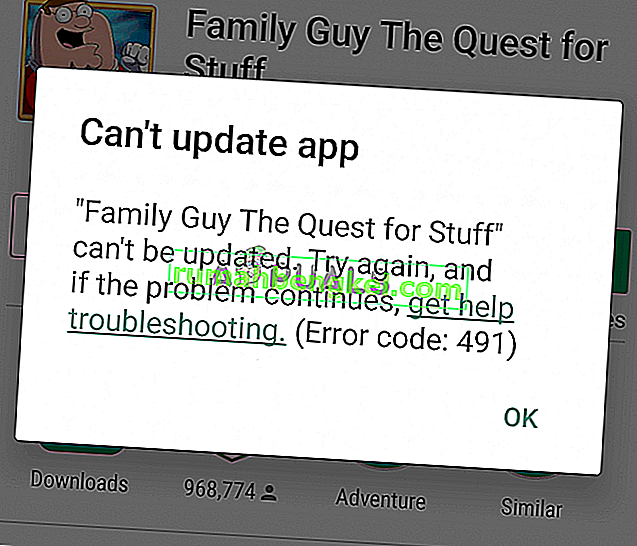
Windows 7アップデートが「アップデートの確認」でスタックし、その後にエラー0x80070057が続くことがよくあるアップデートの問題です。エラーは通常、Windows Update中に発生します。この問題に直面しているWindows 7ユーザーは、アップデートをダウンロードできないようです。Windows Updateが起動しないか、ダウンロード中のある時点で行き詰まります。この問題が原因で、Windows Updateが数時間スタックする可能性があります。
これが発生する原因にはさまざまなものがあります。Windows Updateのダウンロードが許可されていないか、Windows Updateの設定が正しく構成されていないことが原因である可能性があります。管理者権限または感染の問題も原因である可能性があります。

方法1:Windowsアップデートをダウンロードする
- Windowsキーを1回押し、[ コントロールパネル ]をクリックします。
- カテゴリをクリックし、小さいアイコンを選択します
- Windows Updateを選択します
- [ 設定の変更]を選択します
- 重要な更新の下のドロップダウンリストから更新を確認しない(推奨されません)を選択します
- [ OK]をクリックして、コンピュータを再起動します

ここに移動し、KB3020369をダウンロードしてインストールします。この更新プログラムがコンピューターに既にあることを心配しないでください。すでにインストールしている場合は、再度インストールすることはできません。お使いのWindowsバージョンに対応するKB3020369をダウンロードできる場所にダウンロードし、ダウンロードしたファイルを実行します。
インストーラは、アップデートがすでにインストールされているかどうかを検出します。インストールされているか、すでにインストールされていると言われたら、コンピュータを再起動します。
ここで、KB3172605をダウンロードしてください。上記と同じ手順でKB3172605を実行します。インストールしたら、PCを再起動します。
PCが再起動したら、次の手順を実行します。
- 押して、Windowsのキーを一度クリックしコントロールパネルを。
- カテゴリをクリックし、小さいアイコンを選択します
- Windows Updateを選択します
- [ 更新を確認]をクリックします
システムが更新を確認、ダウンロード、インストールするのを待ちます。
方法2:Windowsカタログ
この方法が機能するには、Internet Explorerを使用する必要があります。この方法は、Internet Explorer以外のブラウザから実行した場合は機能しません。Internet Explorerを使用して、問題を解決してダウンロードするために必要な2つのアップデートを選択します。
- Windowsキーを1回押し、[ コントロールパネル ]をクリックします。
- カテゴリをクリックし、小さいアイコンを選択します
- Windows Updateを選択します
- [ 設定の変更]を選択します
- 重要な更新の下のドロップダウンリストから更新を確認しない(推奨されません)を選択します
- [ OK]をクリックして、コンピュータを再起動します
ここでInternet Explorerを開き([スタート]、[Internet Explorer]の順にクリック)、このリンク//catalog.update.microsoft.com/v7/site/home.aspxをアドレスバー(上部中央にあります)に貼り付けます。Internet Explorerがデフォルトのブラウザーでない場合は、リンクをクリックして開くだけでは機能しません。Internet Explorerでリンクをコピーして貼り付けます。
- タイプKB3020369 Windowsカタログ、Enterキーを押しますの検索バーに
- Windowsの正しいビット形式(32または64)を選択していることを確認する前にある[追加]ボタンをクリックします。X64パッケージは64ビット用、x86パッケージは32ビットWindows用です。
- アイテムがバスケットに追加されたことを確認できるはずです。
- 今入力しKB3172605を Windowsカタログの検索バーに入力し、Enterキーを押します
- KB3172605についても手順2を繰り返します。バスケットに2つのアイテムが入っているはずです
- バスケットを見るをクリックします
- ダウンロードをクリック
- クリックしてデスクトップ(またはファイルをダウンロードしたい他の場所)をクリックし、[OK]を
ダウンロードが完了したら、デスクトップ(またはファイルをダウンロードした場所)に移動し、KB3020369インストーラーをダブルクリックします。インストーラーは、KB3020369が既にインストールされているかどうかを確認します。完了したら、システムを再起動します。これは、更新を有効にするために必要です。
次に、デスクトップ(またはファイルをダウンロードした場所)に移動し、KB3172605インストーラーをダブルクリックします。インストーラが終了したら、コンピュータを再起動します。
PCが再起動したら、次の手順を実行します。
- 押して、Windowsのキーを一度クリックしコントロールパネルを。
- カテゴリをクリックし、小さいアイコンを選択します
- Windows Updateを選択します
- [ 更新を確認]をクリックします
更新が完了するまで待ちます。これで問題が解決するはずです。
リマインダー
更新が完了したら、コントロールパネルの以前の設定に戻すことができます。システムが更新を自動的に確認しないようにする場合は、設定を保持することもできます。「更新を確認しない(推奨されません)」オプションを使用している場合は、更新を手動で確認することを忘れないでください。Microsoftはその時点でアップデートをリリースする傾向があるため、少なくとも毎月第1火曜日以降は、少なくとも月に1回はアップデートを確認する必要があります。
方法3:更新コンポーネントをリセットする
この方法では、BITS、暗号化、MSIインストーラー、およびWindows Updateサービスを手動で再起動し、問題を確実に解決するSoftwareDistributionおよびCatroot2フォルダーの名前を変更します。
- Windowsキーを押しながらXキーを押します(Windowsキーを離します)。[ コマンドプロンプト(管理者)]をクリックします
- 入力します。net stop WUAUSERV押しを入力してください
- 入力NET STOP cryptSvc押しを入力します。
- 入力ネットストップビットとプレスを入力します。
- 入力します。net stop msiserver押しを入力してください
- 入力REN C:\ WINDOWS \のSoftwareDistribution SoftwareDistribution.oldをし、Enterキーを押して入力します。
- 入力REN Cを:\ WINDOWS \ System32に\ catroot2 Catroot2.oldキーを押してください
- 入力ネットスタートWUAUSERV押しを入力してください
- 入力ネット開始cryptSvcを押してください
- 入力ネットスタートビットとプレスを入力します。
- 入力ネットスタートmsiserver押しを入力してください
- コマンドプロンプトを閉じます

方法4:DNSサーバー設定の変更
DNSサーバーの設定を変更すると、Windows Updateの問題も解決します。DNSサーバー設定を変更する手順を以下に示します。
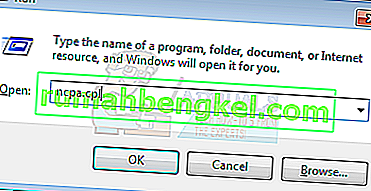
- ホールドWindowsキーを押しRを
- ncpaと入力します。cplを押してEnterキーを押します
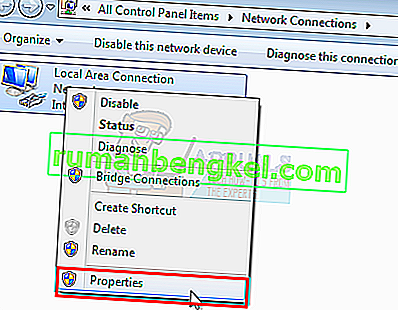
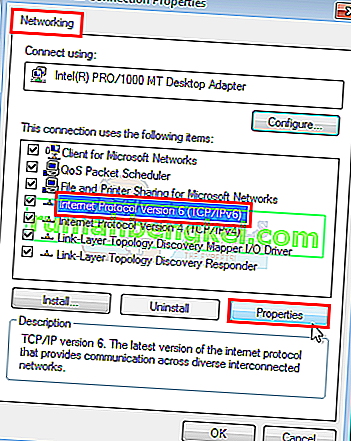
- Right click the connection that you want to change the settings of and select Properties
- Select the Networking tab if it isn’t selected already
- Select Internet Protocol Version 4 (TCP/IPv4) or Internet Protocol Version 6 (TCP/IPv6)
- Click Properties
- Click Advanced button
- Select the DNS tab
- Select the DNS entry in the section DNS server address, in order of use. Note them down somewhere for future reference
- Select Remove to remove the old DNS entry
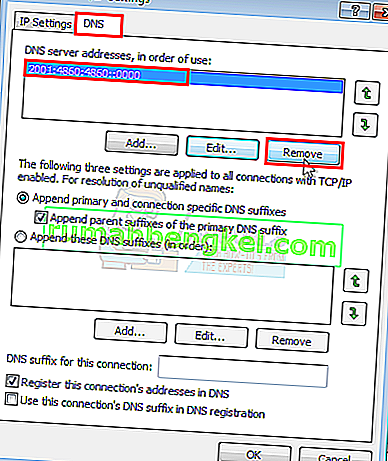
- Now click Add button
- Type 8.8.8 or 8.8.4.4 if you selected IPv4 in step 5
- Type 2001:4860:4860::8888 or 2001:4860:4860::8844 if you selected IPv6 in step 5
- Click Add then select Ok


Now check for Windows updates and see if the problem is solved or not. If your problem is still there or the problem is solved but you want to change the DNS settings back to what they were before, just follow the above given steps and enter the old DNS values on step 11/12.
Method 5: Windows Updates Installation Wizard
The solutions mentioned above usually revolve around downloading and installing the updates manually. That can be a bit tiresome and technical especially if you aren’t a tech savvy person. This solution is for those who don’t want to install the updates manually. You can download the update wizard which will automatically download and install the important updates. All you have to do is to download the wizard and run it. Once you are done, your updates won’t get stuck afterwards.
Note: This wizard will only work if you have Windows 7 SP1 installed. It won’t work on SP2 or anything else.
Note: Once you download the wizard, it might get quarantined by your antivirus especially if you have Norton Antivirus installed on your system. So, if you can’t find the downloaded file then look for the quarantined section of your antivirus. An easier solution for this is to just disable your antivirus before downloading the files. Just simply right click your antivirus icon from the icon tray (right bottom) and select disable.
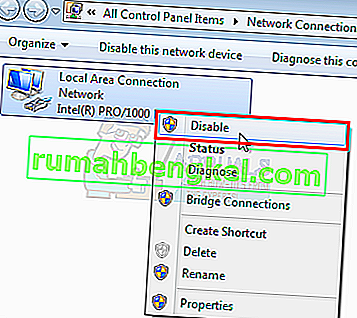
- Disconnect your computer from the internet (before you do, make sure to download the two files in Step 2 and 3). If you don’t know how to do that then follow these steps
- Hold Windows key and press R
- Type ncpa.cpl and press Enter

- Locate and right click your internet connection. Select Disable
- Click here if you have a 64-bit system
- Click here if you have a 32-bit If you aren’t sure about the 32 or 64-bit system then do the following.
- Click Download anyway
- Right click the downloaded file and select Extract. You should have Winzip or Winrar to extract the files
- Select a location to extract these files
- Run the bat or wizard_32.bat file depending on what system type you have.
- Follow the on-screen instructions and you will be good to go.