Steamオーバーレイは、ゲームのプレイ中にSteamにアクセスするために使用されます。友達を招待したり、メッセージを送信したり、ガイドを見つけたり、メッセージに返信したりできます。また、友達の1人がオンラインになっていることを確認したり、プレイしているゲームに招待することもできます。ウィンドウを変更する代わりに、ゲーム内でSteamにアクセスできるので、とても便利なツールです。
多くの人々は、Steamオーバーレイが機能しなくなり、厳しい状況に置かれるという問題を経験します。この問題はユーザーのハードウェアとソフトウェアの構成によって異なるため、この問題の単一の解決策はありません。テストできるソリューションをいくつかリストアップしました。降順で試してください。プロンプトが表示されない限り、解決策をスキップしないでください。
解決策1:管理者アクセスを許可する
Steamオーバーレイが機能しない主な原因は、プログラムに管理者アクセス権がないことです。多くのコンピュータでは、これはSteamをインストールするときのデフォルトのオプションです。実行可能ファイルに移動し、管理者の権限を与える方法について説明します。
- Steamディレクトリを開きます。そのデフォルトの場所はC:\ Program Files(x86)\ Steamです。または、Steamを別のディレクトリにインストールした場合は、そのディレクトリを参照して、問題なく進むことができます。
- 「Steam.exe」という名前のファイルを探します。これはメインのSteamランチャーです。それを右クリックして[ プロパティ ]を選択します。画面上部から[ 互換性 ]タブを選択します。このウィンドウの下部に、「このプログラムを管理者として実行する」というチェックボックスが表示されます。チェックされていることを確認してください。変更を保存して終了します。

- 次に、「GameOverlayUI.exe」という名前のファイルを見つけます。右クリックして、そのプロパティを選択します。画面上部から[ 互換性 ]タブを選択します。このウィンドウの下部に、「このプログラムを管理者として実行する」というチェックボックスが表示されます。チェックされていることを確認してください。変更を保存して終了します。

- Steamを再起動し、ゲームのプレイ中にSteamオーバーレイが機能しているかどうかを確認します。
- そうでない場合は、不具合が発生する可能性があるため、管理者としてそのゲームを実行していないことを確認してください。
- ゲームフォルダーに移動し、その実行可能ファイルを右クリックして[プロパティ]を選択します。
- 互換性タブで、管理者として実行するように設定されていないことを確認します。
解決策2:Steamオーバーレイを有効にする
Steamには、Steamオーバーレイを有効にするオプションがあります。そのオプションが有効になっていないため、オーバーレイが機能していない可能性があります。これを有効にしてSteamを再起動し、問題が解決するかどうかを確認できます。
- Steamクライアントを開きます。
- ウィンドウの左上にあるSteamというオプションをクリックします。ドロップダウンボックスから[ 設定]を選択して、設定インターフェイスを開きます。
- 設定が開いたら、画面の左側にある[ゲーム内]タブをクリックします。ここに、「ゲーム中にSteamオーバーレイを有効にする」というチェックボックスが表示されます。チェックされていることを確認してください。また、正しいオーバーレイショートカットキーを押しているかどうかを確認することもできます。必要に応じて変更することもできます。

- 次に、ウィンドウの上部にある[ ライブラリ ]タブをクリックします。コンピュータにインストールされているゲームがここに表示されます。オーバーレイが機能しないゲームを右クリックし、[ プロパティ]を選択します。
- ここには、「ゲーム中にSteamオーバーレイを有効にする」という別のチェックボックスが表示されます。チェックされていることを確認してください。

- Steamを再起動し、オーバーレイが目的のゲームで機能しているかどうかを確認します。
解決策3:メインゲームフォルダーから開く
別の解決策は、インストールフォルダーから直接プレイしているゲームを開くことです。Steamオーバーレイを無効にするSteamランチャーからゲームを起動すると、バグが発生する可能性があります。
- Steamディレクトリを開きます。そのデフォルトの場所はC:\ Program Files(x86)\ Steamです。または、Steamを別のディレクトリにインストールした場合は、そのディレクトリを参照して、問題なく進むことができます。
- 次のフォルダに移動します
Steamapps
- これで、PCにインストールされているさまざまなゲームが表示されます。Steamオーバーレイが機能しないゲームを選択します。
- ゲームフォルダー内で、「game」という名前のフォルダーを開きます。フォルダ内で、「bin」という名前の別のフォルダを開きます。これで、win32およびwin64という名前の2つのフォルダーが表示されます。コンピューターが32ビット構成の場合はwin32を開き、a64ビット構成の場合はwin64を開きます。
最終的なアドレスは次のようになります。

- ここでは、たとえば「dota2.exe」などのゲームのメインランチャーを使用します。それを右クリックして、[ 管理者として実行 ]オプションを選択します。ゲームが起動したら、Steamオーバーレイが機能しているかどうかを確認します。
解決策4:サードパーティのアプリケーションを無効にする
FrapsやRazer Synapseなどのサードパーティアプリケーションは、Steamオーバーレイにアクセスしようとすると問題を引き起こす可能性があります。その理由は、これらのアプリケーションの実行中にシステムオーバーレイの制御が必要になるためです。システム/画面オーバーレイは、プレイしているゲームとそのサードパーティアプリケーションによって共有されます。別のアプリケーション(スチームオーバーレイ)がアクセスしようとすると、すでに他の2つのパーティによって使用されているため、アクセスできません。最善の方法は、それらを無効にして、ゲームをプレイするときにSteamオーバーレイをもう一度開くことです。
- これらのアプリケーションをそれぞれのオプションから自分で閉じるか、Windows + Rを押してRunアプリケーションを起動できます。
- ダイアログボックスに「taskmgr」と入力して、タスクマネージャを起動します。

- 次に、プロセスのリストから、実行中のすべてのサードパーティアプリケーションを削除して閉じます。Steamを再度起動し、オーバーレイが機能しているかどうかを確認します。
注:セーフモードでネットワークを使用してみて、問題が解決するかどうかを確認することもできます。
解決策5:PCを再起動する
それほど多くはないように見えますが、PCを再起動することで問題を解決できます。Steamがバックグラウンドで更新され、更新がインストールされている場合があります。これらの新しいアップデートにより、PCが再起動されてアップデートで行われたすべての変更が適用されるまで、(Steamオーバーレイを実行して)すべての機能が実行されていない可能性があります。コンピュータを再起動し、Steamを管理者として実行し、ゲームをプレイするときにSteamオーバーレイが機能しているかどうかを確認します。
解決策6:ローカルゲームファイルとライブラリファイルを確認する
It may be the case that your game files may be corrupted or may have some missing game files. Because of this Steam overlay wouldn’t open in your game. Your library files can also be in the incorrect configuration which may lead to a bugged Steam overlay.
- Open your Steam client and click the Library present on the top. Here all your installed games will be listed. Select the game in which Steam overlay fails to open.
- Right-click on the game which is giving you the error and select Properties.
- Once in the properties, browse to the LocalFiles tab and click on the option which says Verify Integrity of Game Files. Steam will then start verifying all the files present according to the main manifest it has. If there is any file missing/corrupted, it will download that files again and replace it accordingly.

- Now navigate to your Settings by pressing the Settings option after clicking Steam present in the bottom left corner of the screen. Once in the Settings, open the Downloads tab present at the left side of the interface.
- Here you will see a box in which it is written “Steam Library Folders”. Click it

- All your steam content information will be listed. Right-click on it and select “Repair Library Files”.

- Restart Steam and open it using Run as administrator
Solution 7: Checking your Firewall and Antivirus
It is a very common reality that your firewall and antivirus software conflicts with Steam. Steam has a lot of processes going on at once to ensure that your gaming experience is nothing but the best. However, many antivirus software marks these processes as potential threats and quarantine them resulting in some processes/applications not working. We have put together a guide on how to put steam as an exception in antivirus.
For disabling the Windows Firewall, follow the steps listed below.
- Press Windows + R button to bring up the Run application. In the dialogue box type “control”. This will open your computer’s control panel in front of you.

- On the top right there will be a dialogue box to search. Write firewall and click on the first option that comes as a result.

- Now at the left side, click the option which says “Turn Windows Firewall on or off”. Through this, you can turn your firewall off easily.

- Select the option of “Turn off Windows Firewall” on both the tabs, Public and Private Networks. Save changes and exit. Restart Steam and launch it using the option Run as administrator.

Solution 8: Checking for Windows updates
As we all know, Steam keeps its client up to date with all the latest upgrades and developments of any operating system. It adapts its functions and options accordingly. If Steam gets updated for that new change in your OS, and your OS isn’t upgraded on your side, it may cause Steam not to function properly. As a result, your Steam overlay won’t launch when you are playing any game. Follow the steps listed below to check for potential updates and install them accordingly.
- Open your Start menu and in the dialogue box type “Settings”. Click on the first results that come. This will open the Settings application.
- Once in the Settings application, you will see a number of options. Browse through them until you find the one named “Update and Security”.

- Once in the Update and Security settings, you will see an option that says Check for updates. Click it and Windows will check for the updates available. It will download them and ask before installing them. Then it may require a computer restart. Save your work before restarting. After it has restarted, launch the Steam client using the option of Run as administrator and check whether the Steam overlay is working or not.

Note: You can also check manually for updates if automatic-check fails.
Solution 9: Disabling gameoverlayui.exe
Gameoverlayui.exe is not essential for the Windows OS. Disabling it causes relatively no problems. It is located in the subfolder of C:\Program Files. It signed by Verisign and has no information regarding its developer. It is also not a Windows system file so you don’t have to worry about it causing any unexpected errors. Disabling this process sometimes fixes the issue of Steam overlay not working. Follow the steps listed below to disable it from task manager.
- Press Windows + R button to bring up the Run application. In the dialogue box type “taskmgr” to launch the task manager.
- Browse to processes and scroll until you find the one named “gameoverlayiu.exe”. Disable it and check if the Steam overlay is working. You may have to restart Steam and run it using the Run as administrator option.

Solution 10: Deleting GameoverlayUI
Before we reinstall Steam and its components, it’s worth a shot to delete the GameoverlayUI application and checking the problem gets fixed. Note that you don’t have to delete it permanently. You can always retrieve it using the Recycle Bin.
- Open your Steam directory. The default location of it is C:\Program Files (x86)\Steam. Or if you installed Steam in another directory, you can browse to that directory and you will be good to go.
- Search for “GameOverlayUI.exe”. Delete it. Restart Steam and open it using Run as administrator. Check if the problem gets fixed. If it doesn’t work, you can restore the deleted file from the Recycle Bin.

Solution 11: Enabling Overlay for Specific Game
In certain cases, the overlay might’ve been disabled for one specific game due to which it is not showing up in that game. In order to change this, we will open the properties for that game and change its configurations. For that:
- Launch Steam and sign in to your account.
- Click on “Library” and then right-click on the game with which you are facing this issue.
- Click on the “General” tab and check the “Enable In-Game Overlay” option.
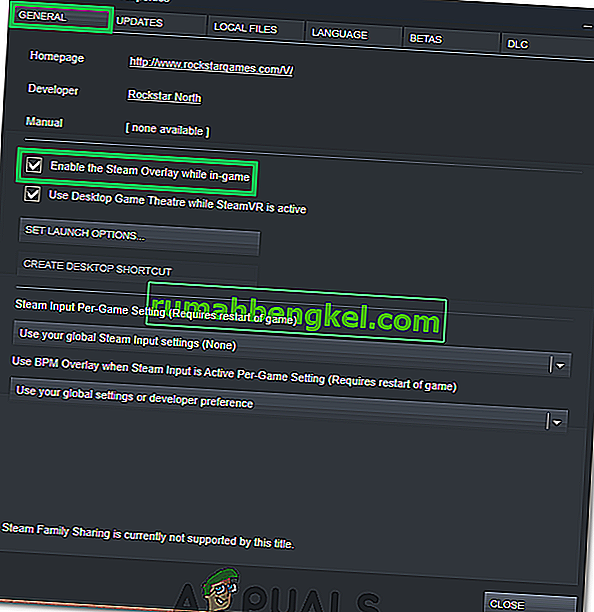
- Check to see if the issue still persists.

Final Solution: Refreshing Steam files
If the error still persists at this stage, we have no choice but to refresh Steam files. Refreshing Steam files will reinstall Steam on your computer again. We will delete some of the configuration folders to ensure that they get renewed upon the installation and all the bad files get removed.
Please note that any interruption during the copy process will corrupt the files and you will have to re-download the entire content over again. Only proceed with this solution if you are sure that your computer won’t be interrupted.
- Navigate to your Steam directory. The default location for your directory is
C:/Program Files (x86)/Steam.
- Locate the following files and folders:
Userdata (folder) Steam.exe (Application) Steamapps (folder- only preserve the files of other games in it)
The user data folder contains all the data of your gameplay. We don’t need to delete it. Furthermore, inside Steamapps, you will have to search for the game that is giving you the problem and only delete that folder. The other files located contain the installation and game files of other games you have installed.
However, if all the games are giving you problems, we suggest that you skip deleting the Steamapps folder and proceed with the following step.

- Delete all other files/folders (except the ones mentioned above) and restart your computer.
- Re-launch Steam using administrator privileges and hopefully, it will start updating itself. After the update is complete, it will run as expected.