Windows 10での黒い画面の問題は通常、アップグレード後、または自動Windows Updateがシステムにアップデートをインストールしたときに発生します。この黒い画面はハードウェア(GPU)の問題である可能性が高いため、さまざまな設定を評価およびトラブルシューティングして診断および修正する必要があります。

最近では、PCは、使用頻度の高い複数のグラフィックカードを搭載することにより、ますます高度なものになっています。したがって、Intelのオンボードグラフィックコントローラー以外のグラフィックカードを使用している場合は、おそらくこの起動で黒い画面の問題が発生することになります。システムに2つのモニターが接続されているかのように、Windowsがこれを受け取る場合があります。したがって、Windowsは出力信号をブラックスクリーンにロードします。
広範なトラブルシューティングに進む前に、基本的な設定を確認する必要があります。複数のモニターを使用している場合は、切断/再接続して、メイン画面でテストします。これで問題が解決した場合; 幸運ですね。そうでない場合は、以下の手順に進みます。
方法1:盲目的に修正する
この方法は、黒い画面では何も見えないため、盲目的に問題を解決するためのものです。
- Windowsが黒い画面で動かなくなったら、白いマウスカーソルが画面に表示されるまで待ちます。マウスパッドを動かすことでその存在を確認できます。
- 画面にカーソルが表示されたら、キーボードのスペースバーを押し、キーボードでCtrlキーを1回押します。ログインパスワードまたは暗証番号を盲目的に入力します(黒い画面には表示されません)。資格情報を使用してWindowsにログインします。
アカウントにログインした後、デスクトップが表示されず、黒い画面が表示されない場合は、キーボードのWin + P +下矢印キー(2回)を押して、詳細をもう一度入力します。
方法2:パワーサイクル
ユーザーが取り外し可能なバッテリーを搭載したラップトップの場合は、
- バッテリーを取り出します。
- 電源アダプタを取り外します。
- 電源ボタンを10秒間押し続けます。
- 電源ボタンを離します。
- 充電器を接続し、電源を入れてみます。

テストして、問題が解決したかどうかを確認します。そうでない場合は、方法4に進みます。
方法3:高速スタートアップをオフにする
Windows 10は、高速起動機能を備えてリリースされています。名前が示すように、オペレーティングシステムの高速起動を可能にするため、作業を再開したり、すばやく再生したりできます。
注:あなたが実行したときにファスト・スタート・アップ機能は動作しますシャットダウンし、その後に回してシステムをあなたが実行するとき、それは適用されません、再起動を。
高速起動オプションをオフにするには、次の手順を実行しますWindows 10インストールメディアを使用して起動します。BIOSから起動順序を変更する必要がある場合があります。
参照:起動可能なWindows 10メディアの作成方法
- 下部にある[ コンピューターを修復する]をクリックします
- トラブルシューティングをクリックします
- 詳細オプションをクリックします
注:この方法が機能しない場合は、[前のバージョンに戻る]をクリックして、画面の指示に従います。
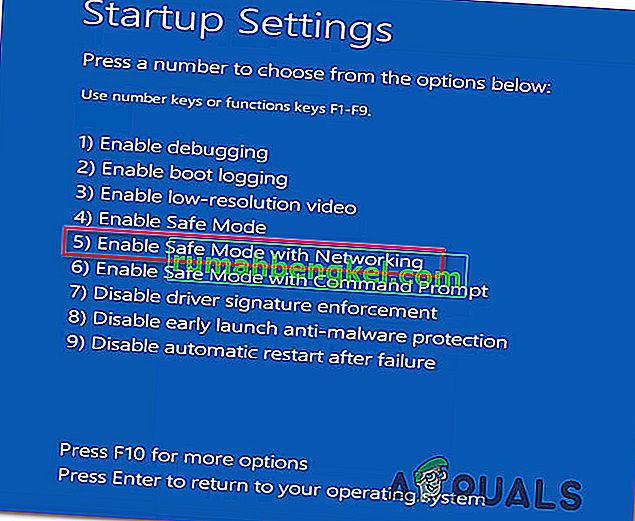
- スタートアップ設定をクリックします
- 再起動をクリックします
- ネットワーキングでセーフモードを選択します
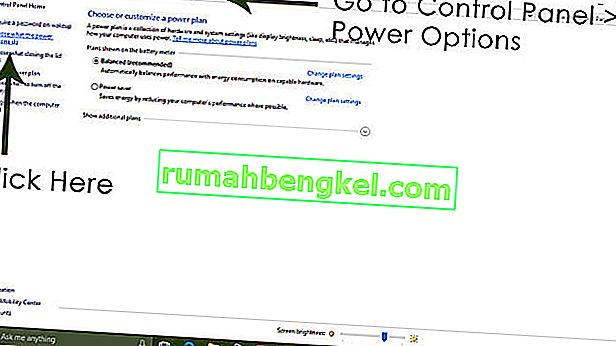
- PCが[ コントロールパネル]に移動し始めると、
- 電源オプションを選択します。左側にある[ 電源ボタンの動作を選択]を選択します。

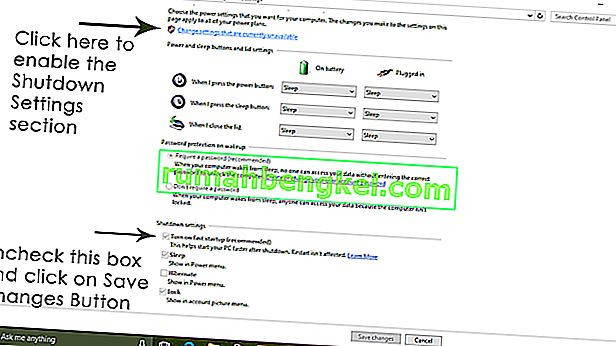
ここで、下にスクロールして[ 高速起動 ]オプションを見つけ、チェックを外します。
方法4:ディスプレイアダプターをアンインストールする
黒い画面が表示されたら:
- ホールドCTRL + ALT + DELのタスクマネージャがポップアップするかどうかを確認するために一緒に鍵を。存在する場合は、[ ファイル ] -> [ 新規 ] ->をクリックし、explorer.exeと入力します。
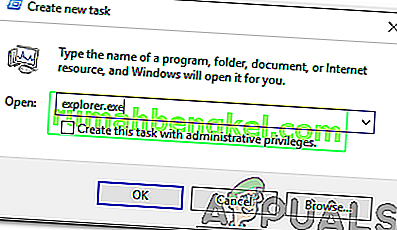
- エクスプローラウィンドウを開く場合。ログインしてウイルス対策ソフトウェア/グラフィックカードをアンインストールしてから、再インストールします。
注:アンチウイルスをアンインストールする代わりに一時的に無効にすることもできます。
- グラフィックス/ディスプレイアダプターをアンインストールするには CTRL + ALT + DELが成功し、エクスプローラーウィンドウが表示されたら、Winキーを押しながらRを押します。
- hdwwiz.cplと入力し、[OK]をクリックします
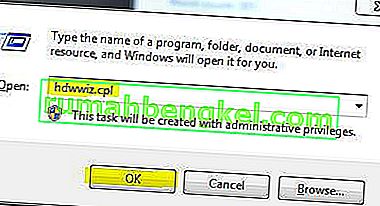
- ディスプレイアダプタの名前を書き留めます。
- 展開ディスプレイアダプタを- > [アンインストール]を選択し


アンインストール後、製造元のサイトにアクセスして最新のドライバーをダウンロードしてください。再起動してテスト
方法5:システムを工場出荷時のデフォルトに戻す
この方法では、すべてのデータが消去され、コンピューターに付属していた元のオペレーティングシステムがインストール/インストールされます。腐敗があるので; データが重要でない場合は、工場出荷時のデフォルトに戻すことができます。その後、Windowsをクリーンインストールします。この後、アップグレードオプションは存在しない可能性があります。
工場出荷時の復元手順については、システムのマニュアルを参照してください。
方法6:コンピューターを再起動するだけ
Some of the Windows 10 users who have suffered from the black screen issue in the past report that simply turning their computer off using its Power button and then starting it back up again did the trick and got rid of the issue for them. As bizarre as it may sound, this solution is certainly worth giving a shot.
Method 7: Update your GPU’s drivers to their latest versions
Windows 10 is a big step up from the previous versions of Windows, which is why all GPU manufacturers had to create entirely new drivers designed specifically for the new Operating System. Not having the updated Windows 10-compatible drivers on your computer is another thing that can cause your computer to be affected by the black screen issue. If outdated drivers are behind the black screen problem in your case, all you need to do is go to the official website of your computer manufacturer or your GPU’s manufacturer and download the latest drivers for your GPU (they should be available in both locations). Make sure that the drivers you download are specifically designed for Windows 10 to ensure the success of this solution.
Method 8: Change your laptop’s plugged in brightness to anything but 100%
On laptops that had high-end graphics cards and were updated to Windows 8, the black screen issue often presents itself when they are plugged into an AC power outlet. If that is the case, simply opening the Start Menu, searching for Advanced power settings, opening Advanced power settings and changing your laptop’s screen brightness when plugged into anything except for 100% (even 99% will do) will get rid of the black screen problem.
Method 9: If you have two graphics cards, disable the onboard one
A decent fix for the black screen issue for people whose computers have tow graphics cards – the onboard graphics card that came with the computer and the graphics card that they have added to it (such as an Nvidia or AMD graphic card) – is to simply disable the onboard graphics card. Apparently, having two graphics cards on a Windows 10 computer can result in a clash that consequently gives birth to the black screen issue. If that is the case, simply going into Device Manager, expanding the Display adapters section, right-clicking on the onboard graphics card and clicking on Disable should fix the issue.
If you do not see your onboard graphics card in the Display adapters section, click on View in the top left of the Device Manager dialog and click on Show hidden devices. This will make your onboard graphics card (or, in some cases, cards) visible, and you can then right-click on it and click on Disable.
Method 10: Refresh your computer
The infamous black screen issue on Windows 10 can also be fixed by simply refreshing your computer. Refreshing your computer has almost entirely the same effect as resetting it to factory settings, with the exception of the fact that a refresh only deletes installed programs and applications and keeps your personal data whereas a reset gets rid of everything on your computer. To refresh a Windows 10 computer, you need to:
- Open the Start Menu.
- Click on Settings.
- Out of the array of different options provided, click on Update & Security.

- Click on Recovery in the left pane.
- In the right pane, click on the Get started button under the Reset this PC
- When provided with a choice to either keep your files or remove everything, click on Keep my files.

Method 11: Correcting User Shell
In some cases, the User shell might be preventing the user from being able to boot safely into their computer. In certain situations, the user shell configuration inside the registry might get corrupted due to which this black screen issue can occur. Therefore, in this step, we will be correcting this user shell entry. In order to do that, follow the steps below.
- Boot your computer and wait for the black screen to appear.
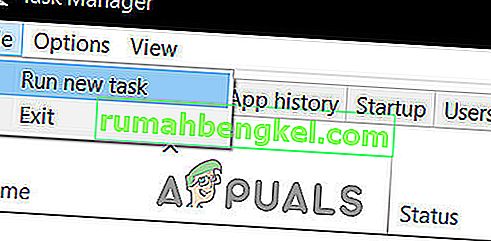
- Press “Ctrl” + “Alt” + “Del” and select the “Task Manager” option.
- Click on the “File” option on the top left of the task manager and select “Run New Task” from the list.
- Type in “regedit” and press “Enter” to open it.
Computer\HKEY_LOCAL_MACHINE\SOFTWARE\Microsoft\Windows NT\CurrentVersion\Winlogon
- Double click on the “Shell” entry on the right pane.
- Type in “Explorer.exe” in the Value data field and save your changes.
- Press “Ctrl” + “Alt” + “Del” again and click on the “Power Options” icon on the lower right side.

- Select “Restart” from the menu and wait for your computer to be restarted.
- Check to see if the issue persists after restarting the computer.


Method 12: Stopping Service
There is a specific service that prevents the computer from being able to function properly in some cases and stopping it can prevent the black screen issue from occurring. Therefore, in this step, we will be stopping this service. For that:
- Press “Ctrl” + “Alt” + “Del” and select the “Task Manager” option.
- Click on the “File” option on the top left of the task manager and select “Run New Task” from the list.
- Type in “services.msc” and press “Enter” to open it.
- Scroll through this list and look for the “RunOnce32.exe” or the “RunOnce.exe” entry. Also, do this same process for the “App Readiness” Service.
- Right-click on it and select “Stop”.
- Double click on it and change its startup type to “Disabled”.
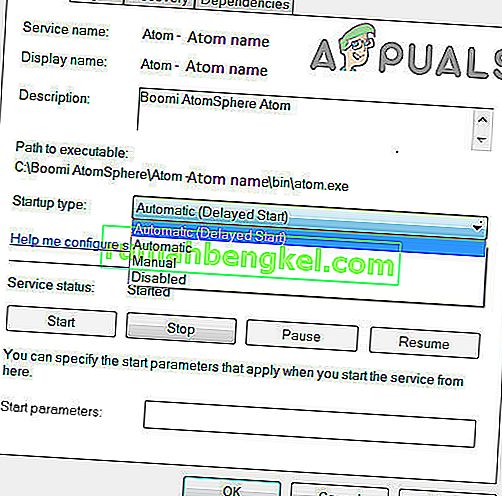
- Wait for the service to be stopped completely and restart your computer.
- Check to see if the issue persists after stopping it completely.

Method 13: Renaming Files
In certain cases, the files in some Windows’ folders might have gotten corrupted due to which this black screen issue is being triggered. Therefore, in this step, we will be renaming these files and then check to see if the issue still persists.
- Press “Ctrl” + “Alt” + “Del” on the black screen.
- Click on the “Task Manager” option and then select “File”.
- Select the “Run New Task” option and then type in “cmd”.
- Type in the following command one by one for each file to rename it.
rename “(File Path) (File Name)” “(New Name)”
- Rename the following files to anything except their original names.
C:\ProgramData\Microsoft\Windows\AppRepository\StateRepository-Deployment C:\ProgramData\Microsoft\Windows\AppRepository\StateRepository-Deployment C:\ProgramData\Microsoft\Windows\AppRepository\StateRepository-Deployment C:\ProgramData\Microsoft\Windows\AppRepository\StateRepository-Machine C:\ProgramData\Microsoft\Windows\AppRepository\StateRepository-Machine C:\ProgramData\Microsoft\Windows\AppRepository\StateRepository-Machine
- Check to see if the issue persists after making these changes.
- If it still does, try the following code to just fix it.
cd "ProgramData\Microsoft\Windows\AppRepository" ren "StateRepository-Deployment.srd" "StateRepository-Deployment-Corrupted.srd" ren "StateRepository-Deployment.srd-shm" "StateRepository-Deployment-Corrupted.srd-shm" ren "StateRepository-Deployment.srd-wal" "StateRepository-Deployment-Corrupted.srd-wal" ren "StateRepository-Machine.srd" "StateRepository-Machine-Corrupted.srd" ren "StateRepository-Machine.srd-shm" "StateRepository-Machine-Corrupted.srd-shm" ren "StateRepository-Machine.srd-wal" "StateRepository-Machine-Corrupted.srd-wal"
- Check to see if the issue persists.
Method 14: Replacing Profile Cache
It is possible the Profile cache for your current user account has either gone missing from some locations or it has been corrupted in certain locations due to which this issue is being triggered. Therefore, in this step, we will be replacing this profile cache after copying it from a location. For that:
- Create a new user account before doing so and log into that.
- Restart your computer in safe mode.
- Log in to your new profile.
- Navigate to the following location and copy the folder named “caches”.
C:\Users\{working-user-profile-name}\AppData\Local\Microsoft\Windows\Caches - Paste this folder in the following location.
C:\Users\{broken-user-profile-name}\AppData\Local\Microsoft\Windows\Caches. - Check to see if the issue persists.
Follow the onscreen instructions and dialogs, and once you are done, your computer will have been refreshed and the black screen issue will be no more.
You can further try to:
- Boot your computer in safe mode and check if the issue persists over there. This will help you to isolate these issues from a specific app that is causing it.
- Press “Windows” + “P” to switch displays that might fix this.
- Update your Bios
- Disconnect the Second monitor
- Try to use an HDMI cable for connection instead of a DVI or VGA one.
- When in the black screen, press the “Windows’ + “Ctrl” + “Shift” + “B” keys to refresh the Graphics Driver.
- You can also try to perform a Startup Repair.
- Try to create a new user account using the last methods listed in this article.
- SFCおよびDISMスキャンを実行します。