多くのユーザーがSteamがダウンロードに失敗する問題を経験しています。コンテンツサーバーにダウンロードできないというメッセージが表示されます。この問題は、ユーザーの構成が多いため、特に1つの問題が原因ではないと言えます。Steamサポートとユーザーからのすべてのメソッドを含むソリューションの一部をリストしました。

解決策1:プロキシ設定を削除する
プロキシサーバーは、オープンインターネットアクセスが制限されている組織で使用されます。プロキシは、ネットワークを追跡し、ユーザーに代替ゲートウェイを提供するために使用されます。多くの場合、Steamがダウンロードのためにサーバーに接続しようとすると、プロキシ設定がハードルになります。
コンピュータでプロキシを無効にする方法は2つあります。
方法1:Chrome
- Chromeブラウザを開き、開いたらChromeメニュー(右上)をクリックします。

- ドロップダウンが表示されたら、[ 設定 ]をクリックします。

- 設定ページが開いたら、上部にあるダイアログバーに「プロキシ」と入力します。

- 検索結果から、「オープンプロキシ設定」という結果を選択します。

- 設定が開いたら、下部にある[接続]タブの[ LAN設定 ]をクリックします。

- 「設定を自動的に検出する」という行のチェックを外します。変更を保存して終了します。Steamを再起動します。

方法2:ネットワーク設定を使用
- Windows + Rボタンを押して、Runアプリケーションを起動します。
- ダイアログボックスで、「inetcpl。cpl "。

- インターネットのプロパティが開きます。[接続]タブに移動し、LAN設定をクリックします。
- LAN設定に入ったら、「設定を自動的に検出する」という行のチェックを外します。変更を保存して終了し、Steamを再起動します。
解決策2:Chrome拡張機能を無効にする
場合によっては、Chromeに存在する拡張機能が実際のハードルを作成することがあります。これらは、ネットワーク設定、特に「Ghostery」というアドオンに干渉します。それはあなたのネットワークを監視し、あなたのデジタルフットプリントを残す場所に統計を提供します。また、アクセスできないWebサイトからデータにアクセスできるようにすることもできます。ダウンロードを続行する前に、Chromeからこれらのアドオンを無効にすることをお勧めします。問題がそれらによって引き起こされていた場合、それは解決されます。
これにはChrome拡張機能だけでなく、ネットワークに関連するプログラム(データモニター、VPNなど)をすべて無効にする必要があります。より複雑なソリューションを続行するよりも、試すことをお勧めします。

解決策3:ダウンロード地域を変更する
基本的な修正の1つには、ダウンロードリージョンの変更が含まれます。
Steamコンテンツシステムは、さまざまな地域に分かれています。クライアントはネットワークを介して地域を自動的に検出し、それをデフォルトとして設定します。特定の地域のサーバーが過負荷になったり、ハードウェア障害が発生したりすることがあります。したがって、ダウンロード領域を変更すると、問題の問題が解決する場合があります。次の解決策に進む前に、ダウンロードリージョンの変更を何度も試すことができます(1回に限定されない)。
- Steamを開き、ウィンドウの左上隅にあるドロップダウンメニューの[設定]をクリックします。
- 「ダウンロード」を選択し、「ダウンロードリージョン」に移動します。
- 自分以外のリージョンを選択して、Steamを再起動します。

解決策4:clientregistry.blobを削除する
Steamのクライアントレジストリが破損する可能性があり、これがエラーに直面している理由である可能性があります。名前の変更/削除を試すことができます。
- 上記のソリューションで説明したように、Steamを完全に終了し、すべてのタスクを終了します。
- Steamディレクトリに移動します。デフォルトはC:\ Program Files \ Steamです。
- ' clientregistry.blob'を見つけます。

- ファイルの名前を「clientregistryold.blob」に変更します(または、ファイルを完全に削除できます)。
- Steamを再起動し、ファイルを再作成できるようにします。
うまくいけば、クライアントは期待どおりに実行されます。それでも機能しない場合は、以下の手順に従ってください。
- Steamディレクトリに戻ります。
- 'Steamreporterを見つけます。exe '。

- アプリケーションを実行し、Steamを再起動します。
解決策5:Steamダウンロードキューをクリアする
Steamクライアントに保留中のダウンロードが多数ある場合は、1つを除いてそれらをすべて削除し、Steamを再起動することをお勧めします。
- Steamクライアントを開いて[ ライブラリ ]タブに移動します。
- 下部に、「ダウンロードを一時停止しました」というクリック可能なオプションが表示されます。クリックすると、キューに入っているすべてのオプションが表示されます。

- 下の図に示すようにボタンを1つずつクリックして、アイテムをキューから削除します。

- Once you have removed them, right click on games (except the one which you want to download first) so the settings come forward. Once the Settings open, click on “Uninstall” button.

- Steam will prompt you to confirm your actions. Click Delete when the prompt comes forward and restart Steam before trying to download that one game again.

Solution 6: Using flush config
We can try running the flush config command to reset the configuration. Follow the steps below.
- Press Windows + R to bring up the Run application.
- In the dialogue bar, type “steam://flushconfig”.

- Press OK. Steam will now pop a window to confirm your actions. Press Ok and restart Steam.

Solution 7: Starting Steam in Safe mode with networking.
Before resorting to more technical methods, you can try running your PC in safe mode (with networking) and try to start the Steam download.
- Get your computer to safe mode by selecting from various options available. Select ‘Enable Safe Mode with Networking’. You can learn how to get your PC to safe mode from here. If you are running Windows 7, press F8 upon the startup of your PC and you will be directed to a similar window where you can select the required option.
- Open Steam and try updating/installing with it again. This method should remove all obstacles (if any) which your Steam may be experiencing.

Solution 8: Disabling Safe-web from router
Your WiFi router may have a setting called safe-web in it. What this does is filter all the incoming data it deems are not trustworthy. It is very common for it to flag Steam as one and disrupts the connection with your computer.
Since there are hundreds of different routers used by the users, it is very difficult to list the solution on how to disable the option for every one of them. Here are some guidelines so you can have an idea.
- Web Safe can be found in the parental control section on the WiFi router configuration.
- It can also be found on the Virus section or the Filtering section.
- To enter your router settings, type the IP which is associated with it (for example for some it is 192.168.1.1). You can check the required IP either by calling your modem provider or by looking at the back of the device ( even its packaging box may have details).
Solution 9: Disabling Anti-virus and Defender/firewall
Before proceeding to reinstall Steam, we can try meddling with the antivirus. Antivirus monitors each packet of your computer sends and receives. Although Steam has collaborated with most of them so they don’t give problems, sometimes they do. The solution is to disable/uninstall them and check if you are able to download then.
McAfee Antivirus:
McAfee has no way to exclude certain files from its real time scanning. The only way is to disable the antivirus entirely until the game is updated. To do this, open McAfree and select “Virus and Spyware Protection”. Here you find the option of “Real-Time Scanning”. Click that option and turn it off.

Then follow the following instruction to verify integrity of game files.
- Restart your computer and relaunch Steam.
- Head over to the library section and right click on the game which is giving you problems.
- Click on its properties and select the local files tab.
- Click the verify integrity of game files button and Steam will verify that game in a few minutes.
Hopefully, after performing the above steps, your Steam won’t give any issue.

ESET NOD32
NOD32 has the tendency to mark some application files as malicious and will most probably quarantine it. This often results in the error while updating a game. Browse to your current Steam directory and copy the address
- The default location for your steam folder should be “C:\Program Files (x86)\Steam”.
Press ⊞ Win + R button. This should pop-up the Run application.
In the dialogue box write “C:\Program Files (x86)\Steam”.

Or if you installed Steam in another directory, you can browse to that directory and you can proceed with steps mentioned below.
After copying the address open ESET NOD32 and paste the location in exclude from real time scanning.
Follow the ‘verify integrity of game files’ method listed above and you will be all good.

Kaspersky AV
Kaspersky may sometimes flag Steam as an intruder and disable it from making any changes to the hard drive. To fix this, head over to ‘threats and exclusions’. Navigate to ‘trusted zone’ and add Steam.exe as a trusted application. Remember to change the settings to Do not restrict application activity as well as Do not scan opened files.
Follow the ‘verify integrity of game files’ method listed above and restart your computer.

Windows Defender
- Click Windows button and in the search bar type “Windows defender”. Among all the options, there will be an application named “Windows Defender Security Center”. Open it.
- Upon opening, you will find a list of options available in the new window. Select the option “Virus and threat protection”.

- Upon entering the menu, navigate to Virus and Threat Protection Settings. Windows may prompt you to allow administrator access to use this feature. If so, press Yes.

- After entering the required menu, you should search the window which says “Add or remove exclusions”. Click it and you will be navigated to a menu where you can add exclusions. You can exclude folders, extensions, and even files. In this case, we will exclude the whole Steam folder which is located in the directory you downloaded it.

- Click on the option which says “Exclude a folder” and navigate to your Steam directory. The default location for your steam folder should be “C:\Program Files (x86)\Steam”. Once you reach the location select the folder and save changes.
- Restart your computer and run Steam with administrative privileges. Hopefully, your speed issue will be resolved.
Solution 10: Downloading Latest Steam Client
- The default location for your steam folder should be “C:\Program Files (x86)\Steam”.
Press ⊞ Win + R button. This should pop-up the Run application.
In the dialogue box write “C:\Program Files (x86)\Steam”.

Or if you installed Steam in another directory, you can browse to that directory and you can proceed with steps mentioned below.
- Locate the following folders:
Steam.exe (Application)SteamApps (Folder)Userdata (Folder)
- Delete all the other files/folders/applications except the ones mentioned above.
- Head over to the Steam website and download the latest Steam client. Don’t launch the old Steam.exe present in your directory at all. The problem won’t be solved.
- Install Steam using the installer in the same directory as your previous one. Hopefully, after installation, the problem will be solved.
Solution 11: Changing Default Browser
In a weird turn of events, having Chrome or any other browser set as the default browser sometimes causes issues with the download request that Steam sends to its servers. Therefore, in this step, we will be setting internet explorer as our default browser temporarily to make sure that the download proceeds. For that:
- Press “Windows’ + “I” to open settings.
- In settings, click on “Apps” and then select “Default Apps” from the left pane.
- Click on the “Web browser” option and then select “Internet Explorer” from the list.
- Open Steam and check to see if the issue persists.

Solution 12: Removing Steam Content Server Limiter
In certain cases, it was shown that uninstalling Steam Content Server Limiter from the Classical Control Panel interface fixes this issue for a lot of people. Therefore, in this step, we will be doing exactly that. For that:
- Press “Windows’ + “R” to open the Run prompt.
- Type in “Control” and press “Enter”.

- Click on the “Uninstalla Program” option and then right-click on the “Steam Content Server Limiter” and select “Uninstall”.
- After the server limiter is uninstalled, check to see if the issue persists.

Method 13: Changing DNS
In certain situations, the server DNS that the computer is using to communicate with the internet might not be compatible either with the steam servers or it might be facing issues temporarily. Therefore, in this step, we will be changing our DNS servers. For that;
- Press “Windows’ + “R” to open the Run prompt.
- Type in “ncpa.cpl” and press “enter”.

- Right-click on your network adapter and select “Properties”.
- In properties, double click on the “Internet Protocol Version 4(TCP/IPV4)” option and check the “Use following DNS Addresses” option.
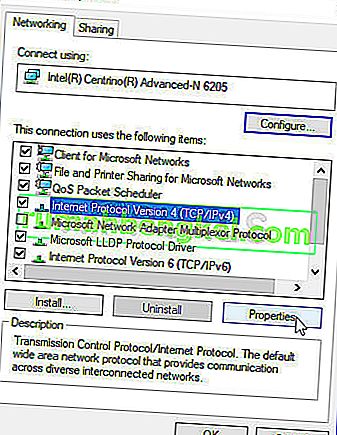
- Type in “8.8.8.8” in the primary DNS address and “8.8.4.4” in the secondary DNS address.
- Click on “OK” and then check to see if the issue persists. If it does, try using “1.1.1.1” and “1.0.0.1” in the fields respectively.


Method 14: Changing Config File
In certain situations, the config file on the computer might require some editing in order to get it some games to start working. The steps listed below are primarily for Mac but you can try them on some older OS such as Windows XP too as some users reported that this fixed it for them.
- Open the Mac Finder and navigate to the following directory.
drive_c/Program Files/Steam/config/
- Launch the “config.vdf” file and wait for it to open.
- Find the following text lines inside the file.
"InstallConfigStore" { "Software" { "Valve" { "Steam" "cip" - Paste the following lines of code under the “cip” entry in the config after creating a new line under it.
CS" "valve511.steamcontent.com;valve501.steamcontent.com;valve517.steamcontent.com;valve557.steamcontent.com;valve513.steamcontent.com;valve535.steamcontent.com;valve546.steamcontent.com;valve538.steamcontent.com;valve536.steamcontent.com;valve530.steamcontent.com;valve559.steamcontent.com;valve545.steamcontent.com;valve518.steamcontent.com;valve548.steamcontent.com;valve555.steamcontent.com;valve556.steamcontent.com;valve506.steamcontent.com;valve544.steamcontent.com;valve525.steamcontent.com;valve567.steamcontent.com;valve521.steamcontent.com;valve510.steamcontent.com;valve542.steamcontent.com;valve519.steamcontent.com;valve526.steamcontent.com;valve504.steamcontent.com;valve500.steamcontent.com;valve554.steamcontent.com;valve562.steamcontent.com;valve524.steamcontent.com;valve502.steamcontent.com;valve505.steamcontent.com;valve547.steamcontent.com;valve560.steamcontent.com;valve503.steamcontent.com;valve507.steamcontent.com;valve553.steamcontent.com;valve520.steamcontent.com;valve550.steamcontent.com;valve531.steamcontent.com;valve558.steamcontent.com;valve552.steamcontent.com;valve563.steamcontent.com;valve540.steamcontent.com;valve541.steamcontent.com;valve537.steamcontent.com;valve528.steamcontent.com;valve523.steamcontent.com;valve512.steamcontent.com;valve532.steamcontent.com;valve561.steamcontent.com;valve549.steamcontent.com;valve522.steamcontent.com;valve514.steamcontent.com;valve551.steamcontent.com;valve564.steamcontent.com;valve543.steamcontent.com;valve565.steamcontent.com;valve529.steamcontent.com;valve539.steamcontent.com;valve566.steamcontent.com;valve165.steamcontent.com;valve959.steamcontent.com;valve164.steamcontent.com;valve1611.steamcontent.com;valve1601.steamcontent.com;valve1617.steamcontent.com;valve1603.steamcontent.com;valve1602.steamcontent.com;valve1610.steamcontent.com;valve1615.steamcontent.com;valve909.steamcontent.com;valve900.steamcontent.com;valve905.steamcontent.com;valve954.steamcontent.com;valve955.steamcontent.com;valve1612.steamcontent.com;valve1607.steamcontent.com;valve1608.steamcontent.com;valve1618.steamcontent.com;valve1619.steamcontent.com;valve1606.steamcontent.com;valve1605.steamcontent.com;valve1609.steamcontent.com;valve907.steamcontent.com;valve901.steamcontent.com;valve902.steamcontent.com;valve1604.steamcontent.com;valve908.steamcontent.com;valve950.steamcontent.com;valve957.steamcontent.com;valve903.steamcontent.com;valve1614.steamcontent.com;valve904.steamcontent.com;valve952.steamcontent.com;valve1616.steamcontent.com;valve1613.steamcontent.com;valve958.steamcontent.com;valve956.steamcontent.com;valve906.steamcontent.com"
- Save your changes and check to see if the issue persists.
Note: Some users reported to fix the issue after having to deleting the CM List IP addresses in the file aswell in addition to pasting this code.