一部のWindowsユーザーは、OSの新しいアップデートを検索してダウンロードできません。影響を受けるほとんどのユーザーは、更新のダウンロードが開始されると報告していますが、プロセスが完了せず、エラーコード8024A000が表示されます。エラーコードによると、このエラーは、Windows Updateが重要なタスクの実行中に更新セッションが中止されないようにするときに発生します。この問題はWindows 10、Windows 8.1、Windows 7で発生すると報告されているため、特定のWindowsバージョンに限定されません。

Windows Updateエラーコード8024A000の原因は何ですか?
さまざまなユーザーレポートを確認し、このエラーコードの最も一般的な修正のいくつかを分析して、この特定の問題を調査しました。結局のところ、この問題を引き起こしてしまう可能性のある潜在的な原因はいくつかあります。
- Windows Updateの不具合 –この問題は、繰り返し発生するWUの問題が原因で発生する可能性があります。特定の状況下では、アップデートコンポーネントがスタックし、保留中の新しいアップデートをインストールできなくなります。この場合、Windows Updateトラブルシューティングツールは、適切な修復戦略を適用した後で、問題を自動的に解決できるはずです。
- Windows Updateサービスが不安定な状態でスタックしている – 結局のところ、この問題は、1つ以上のWindowsサービスが開始も停止もされていない場合にも発生する可能性があります。このシナリオが当てはまる場合は、昇格されたCMDプロンプトを使用して、関連するすべてのサービスを強制的に停止および再起動することにより、問題を解決できるはずです。
- WUに関連付けられたDLLが正しく登録されていない – Windows Updateは、保留中の更新を検索およびインストールするときに、何十ものダイナミックリンクライブラリファイルに依存しています。この場合、管理者特権のコマンドプロンプトウィンドウから関連するDLLを再登録することで、問題を解決できるはずです。
- システムファイルの破損 –システムファイルの破損も、この特定のエラーメッセージの原因である可能性があります。破損したファイルが1つあると、WUコンポーネント全体が効果的に破壊される可能性があります。このシナリオが該当する場合は、システムファイルチェッカーまたはDISMを使用して破損したファイルを修復することで問題を解決できるはずです。
- RSTドライバーがWindowsインストールにない –この特定の問題は、コンピューターにRapid Storage Technologyドライバーがないか、非常に古いバージョンを使用している場合にも発生する可能性があります。影響を受けた複数のユーザーが、最新バージョンのRSTドライバーをインストールすることで問題を解決したと報告されています。
- サードパーティのAVがWindows Updateで使用されるポートを閉じている–一部のサードパーティのAVツールは非常に保護されているため、Windows Updateで使用される正当なポートを閉じる傾向があります。McAfee Total Protection、AVAST、およびComodoがこのリストの上位にありますが、他にもある可能性があります。この場合、サードパーティスイートをアンインストールし、組み込みのソリューション(Windows Defender)を使用して問題を解決できるはずです。
このエラーメッセージを解決するのに苦労している場合は、この記事で正しい方向を示す必要があります。以下に、同様の状況にある他のユーザーがこの問題を解決するために使用したいくつかの潜在的な修正を示します。
可能な限り効率を維持するために、以下の方法を記載されている順序で実行し、シナリオに該当しない手順を破棄することをお勧めします。最終的には、原因となっている原因に関係なく、特定のケースで問題を解決する修正を見つける必要があります。
方法1:Windows Updateトラブルシューティングツールを実行する
この問題が発生した場合は、まずWindows Updateトラブルシューティングを実行する必要があります。影響を受けた数人が、Windows Updateトラブルシューティングツールにエラーコード8024A000を自動的に修正させることで問題を解決しました。
一部の影響を受けるユーザーは、Windows Updateトラブルシューティングツールを実行してコンピューターを再起動した後、問題が解決したと報告しています。Windowsのバージョンに、この特定のエラーの修復方法が含まれている可能性があります。その場合、トラブルシューティングツールが自動的に修復戦略を適用し、数回クリックするだけで問題を修正できます。
以下は、Windows Updateトラブルシューティングツールの実行に関するクイックガイドです。
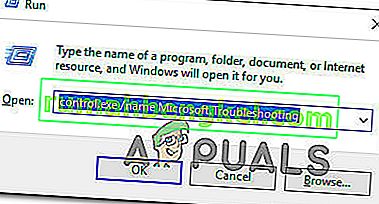
- 押してWindowsキー+ R開くためのファイル名を指定して実行 ]ダイアログボックスを。次に、テキストボックスに「control.exe / name Microsoft.Troubleshooting」と入力し、Enterキーを押して、設定アプリの[ トラブルシューティング ]タブを開きます。
- [トラブルシューティング]タブが表示されたら、[ 起動して実行 ]タブまでスクロールし、[ Windows Update ]をクリックします。次に、新しく表示されたメニューから[ トラブルシューティングを実行 ]をクリックします。
- 最初のスキャンが完了するまで待ち、実行可能な修復戦略が見つかった場合は、[ この修正を適用 ]をクリックします。
- 修正が実装されている場合は、コンピューターを再起動し、次の起動シーケンスが完了したら問題が解決するかどうかを確認します。

Windows Updateをインストールしようとしたときに同じエラーコード8024A000が引き続き発生する場合は、下の次の方法に移動します。
方法2:Windows Updateサービスを再起動する
結局のところ、この特定の問題は、Windows Updateサービスが不安定な状態(起動も停止もされていない)で動かなくなることが原因で発生することもあります。一部の影響を受けるユーザーは、WU(Windows Update)コンポーネントで使用されるすべてのサービスを再起動することで問題を解決できたと報告しています。
この手順は、最近のすべてのWindowsバージョン(Windows 7.1、Windows 8.1およびWindows 10)で有効であることが確認されています。
これを行う方法のクイックガイドを次に示します。
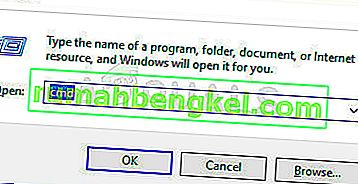
- 押してWindowsキー+ Rを開くためにファイル名を指定して実行 ]ダイアログボックスを。次の画面で、テキストボックスに「cmd」と入力し、Ctrl + Shift + Enterキーを押して、昇格されたコマンドプロンプトを開きます。UAC(ユーザーアカウント制御)のプロンプトが表示されたら、[ はい ]をクリックして管理者権限を付与します。
- 管理者特権のCMDプロンプトが表示されたら、次のコマンドを順番に入力してEnterキーを押し、すべてのWindows Updateサービスを再起動します。
ネットストップwuauservネットストップビットネットストップcryptsvc
- WUサービスが完全に停止したら、次のコマンドを入力してEnterキーを押し、サービスを再起動します。
net start wuauserv net startビットnet start cryptsvc exit
- 手順が完了したら、コンピューターを再起動し、次の起動シーケンスが完了したら問題が解決するかどうかを確認します。

保留中のWindows更新プログラムをインストールしようとしたときに同じエラーコード8024A000が引き続き発生する場合は、下の次の方法に移動します。
方法3:Windows Updateに関連するDLLを再登録する
結局のところ、定数8024A000エラーコードの理由は、正しく登録されなくなったDLL(ダイナミックリンクライブラリ)ファイルである可能性もあります。これは通常、古いバージョンのWindowsで発生すると報告されており、通常、破損が原因か、ウイルス感染が原因でセキュリティスキャナーが一部のアイテムを隔離した後に発生します。
If this scenario is applicable to your current situation, here’s a quick guide on how you can re-register the DLLs pertaining to WU (Windows Update) in order to fix the 8024A000 Error Codes:
- Press Windows key + R to open up a Run dialog box. Then, type “notepad” in the text box and press Ctrl + Shift +Enter to open up a Notepad window with elevated access. When prompted by the UAC (User Account Control)

- Inside the new Notepad document, paste the following commands:
regsvr32 c:\windows\system32\vbscript.dll /s regsvr32 c:\windows\system32\mshtml.dll /s regsvr32 c:\windows\system32\msjava.dll /s regsvr32 c:\windows\system32\jscript.dll /s regsvr32 c:\windows\system32\msxml.dll /s regsvr32 c:\windows\system32\actxprxy.dll /s regsvr32 c:\windows\system32\shdocvw.dll /s regsvr32 wuapi.dll /s regsvr32 wuaueng1.dll /s regsvr32 wuaueng.dll /s regsvr32 wucltui.dll /s regsvr32 wups2.dll /s regsvr32 wups.dll /s regsvr32 wuweb.dll /s regsvr32 Softpub.dll /s regsvr32 Mssip32.dll /s regsvr32 Initpki.dll /s regsvr32 softpub.dll /s regsvr32 wintrust.dll /s regsvr32 initpki.dll /s regsvr32 dssenh.dll /s regsvr32 rsaenh.dll /s regsvr32 gpkcsp.dll /s regsvr32 sccbase.dll /s regsvr32 slbcsp.dll /s regsvr32 cryptdlg.dll /s regsvr32 Urlmon.dll /s regsvr32 Shdocvw.dll /s regsvr32 Msjava.dll /s regsvr32 Actxprxy.dll /s regsvr32 Oleaut32.dll /s regsvr32 Mshtml.dll /s regsvr32 msxml.dll /s regsvr32 msxml2.dll /s regsvr32 msxml3.dll /s regsvr32 Browseui.dll /s regsvr32 shell32.dll /s regsvr32 wuapi.dll /s regsvr32 wuaueng.dll /s regsvr32 wuaueng1.dll /s regsvr32 wucltui.dll /s regsvr32 wups.dll /s regsvr32 wuweb.dll /s regsvr32 jscript.dll /s regsvr32 atl.dll /s regsvr32 Mssip32.dll /s
- Once you pasted the commands, go to File (from the ribbon menu at the top) and click on SaveAs.
- From the Save As window, name the file whatever you want but make sure to set the extension of the File Name to .bat. We saved it WindowsUpdateRegister.bat. Then, select a convenable location and click on Save.
- Double-click on the newly created BAT file and click Yes at the confirmation prompt. If you’re also prompted by the UAC (User Account Control) click Yes to grant admin access.
- Once the DLL files have been re-registered, restart your computer and see if the issue has been resolved once the next startup sequence is complete.


If the 8024A000 issue is still occurring, move down to the next method below.
Method 4: Performing SFC and DISM Scans
This particular issue can also occur due to some degree of system file corruption. Although the issue is less common on Windows 10, it’s still possible to get this error code due to some corrupted system file even if you’re system is up to date.
Both DISM (Deployment Image Servicing and Management) and SFC (System File Checker) are built-in utilities capable of repairing system files. The only difference is they do it in different ways.
While SFC scans and repairs system files by replacing corrupted files with locally stored copies, DISM relies on Windows Update to fix corruption. That’s why it’s important to start this procedure with the SFC scan – if WU has a corruption problem, the System File Checker should resolve it, allowing you to use DISM effectively.
Here’s a quick guide on running an SFC and DISM scan from an elevated Command Prompt:
- Press Windows key + R to open up a Run dialog box. Then, type “cmd” inside the text box and press Ctrl + Shift + Enter to open up an elevated Command Prompt. When you’re prompted by the UAC (User Account Control), click on Yes to grant administrative privileges.
- Once you’re inside the elevated Command Prompt, type the following command and press Enter immediately to start the SFC scan:
sfc /scannow
Note: Keep in mind that once you start this process, there’s no way to stop it without running the risk of producing even more disk errors. Be patient and don’t close the CMD window or attempt to restart your computer.
- When the procedure is complete, you can safely close the elevated command prompt and restart your computer to see if the issue has been resolved at the next system startup.
- If the same issue is still occurring even after you’ve performed the SFC scan, follow step 1 again to open another elevated Command Prompt. Then, type the following command and press Enter to perform a DISM scan:
DISM /Online /Cleanup-Image /RestoreHealth
Note: DISM requires a stable Internet connection in order to be able to download fresh copies of the files that are affected by corruption.
- Once the scan is finished, perform one final restart and check if the issue has been resolved once the next startup sequence is complete.
Method 5: Instaling the Intel Rapid Storage Technology Driver (if applicable)
Another possible culprit that might end up causing the 8024A000 error code is a missing our updated Intel Rapid Storage Technology Driver. Several affected users have reported that the issue was no longer occurring after they installed the latest version of this driver and restarted their computer.
Based on our investigations, this scenario is mostly reported to occur in instances where the user is encountering the issue on Windows 7 or below. If this is applicable, follow the steps below to install the latest driver of Intel Rapid Storage:
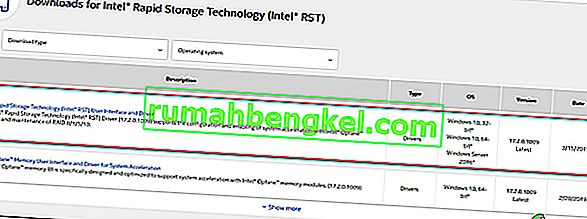
- Visit this link (here) and click on Intel Rapid Storage Technology *RST) User Interface and Driver to initiate the download.
- Once the download is complete, open the installation executable and follow the on-screen prompts to complete the installation of the latest RST driver.
- Restart your computer once the driver is installed and see if the issue has been resolved once the next startup sequence is complete.

If you’re still encountering the 8024A000 Error Code, move down to the next method below.
Method 6: Uninstalling 3rd party AV
As it turns out, it’s also possible that the issue is actually being caused by an overprotective 3rd party AV suite. Several affected users have reported that the issue was resolved after they uninstalled the 3rd party security scanner and reverted back to the default AV (Windows Defender).
McAfee Total Protection, AVAST, and Comodo are commonly reported as being responsible for causing the 8024a000. Users are speculating that the issue occurs because the AV ends up blocking some ports that are actually being used by the WU component.
UPDATE: Based on several user reports, this issue can also be caused by the premium version of Malwarebytes. If you’re using a premium subscription for Malwarebytes, you should be able to resolve the issue by disabling Ransomware protection from the Settings menu.
If you’re suspecting that your third-party AV/firewall is causing the issue, follow the steps on this article (here) to completely uninstall your AV suite without leaving any remnant files.
If this scenario is not applicable or the issue is still occurring even after you’ve uninstalled your 3rd party AV suite, move down to the next method below.
Method 7: Performing a repair install
If none of the methods above have helped you to resolve the issue, a repair install should end up repairing the Windows Update problems. This procedure will reset all Windows components, including booting-related processes.
However, it does things a bit more efficiently than a classic clean install in the sense that it allows you to keep all personal data including photos, videos, applications, and games). The only thing that will get deleted and replace are all Windows components – which is exactly what you need.
In case you want to go for a repair install, you can follow the instructions on this article (here) for step by step instructions on how to do this efficiently.