ウィッチャー3:ワイルドハントは、CD Projektによって公開および開発されたアクションロールプレイングゲームです。これは、デジタルの世界でかなりの足跡を残している進行中のゲームシリーズです。

ゲームの人気にもかかわらず、ゲームプレイや映画の最中にゲームがクラッシュするという特定の問題に遭遇しました。ゲームがクラッシュした後、エラーメッセージは表示されず、ユーザーはデスクトップにリダイレクトされました。エラーメッセージがまったくなく、問題の原因も特定されていないため、これはイライラします。
この記事では、この問題が発生する理由と、問題を解決するための回避策について、すべての原因について説明します。
Witcher 3がクラッシュする原因は何ですか?
すべてのユーザーレポートを分析し、コンピューターで実験した結果、問題はソフトウェアの問題からハードウェアの問題まで、さまざまな理由で発生したと結論付けました。この問題が発生する可能性がある理由の一部は、次のものに限定されません。
- ビデオカード/ハードウェアの過熱:これはおそらく、私たちが遭遇した最も一般的な原因の1つです。ビデオカードまたはその他のハードウェアが過熱している場合、問題を修正するためのコンピューターがゲームをクラッシュさせます。
- 破損した/不完全なインストール:インストールが何らかの理由で破損しているか、ファイルが欠落している場合、突然のクラッシュが発生する可能性があります。ゲームファイルを確認すると、問題が解決する場合があります。
- NVIDIAストリーミングサービス:グラフィックスジャイアントが提供するストリーミングサービスは類を見ないツールの1つですが、使用していない場合でもゲームと競合してクラッシュすることが知られています。
- Mods: ModsはWitcher 3のゲームプレイをさらに楽しくしますが、すべてのModのすべての欠点と同様に、これも例外ではありません。MODがゲームと競合すると、クラッシュします。
- Steamクラウドセーブ: Steamクラウドセーブは、外出先でゲームプレイを保存するためにSteamが提供する機能です。このサービスは定期的にファイルを保存します。この行為自体がWitcher 3との競合を引き起こし、Witcher 3をクラッシュさせることが知られています。
- オーバークロック:オーバークロックは、PCからジュースを増やすための「ツール」です。しかし、明らかな理由なしにシステムを不安定にしてクラッシュさせることも知られています。通常、アクションを無効にすると問題が解決します。
- 破損したグラフィックカードドライバー:グラフィックカードは、コンピューターでゲームをプレイする主な原動力です。ドライバーがハードウェアと同期していない場合、ゲームが途中でクラッシュする可能性があります。
- GOG Galaxyのオーバーレイ: GOG GalaxyはSteamと同様にゲームコレクションプラットフォームであり、そのオーバーレイはWitcher 3で問題を引き起こすことが知られています。オーバーレイを無効にすると、ここで機能します。
- GPUコネクタ: GPUは、さまざまなコネクタを介してメインマザーボードに接続されています。これらのコネクタが緩んでいると、情報が適切に送信されず、ゲームの操作に問題が発生する可能性があります。
- 高いグラフィック設定:非常に高いグラフィック設定があり、それらを処理する適切なPCがない場合、いくつかの問題が発生し、ゲームがフリーズ/クラッシュする可能性があります。
ソリューションを開始する前に、管理者としてログインしていることを確認します。また、コンピュータを頻繁に再起動するため、事前に作業を保存してください。
前提条件:システム要件
ソリューションを開始する前に、コンピューターがゲームのシステム要件を満たしているかどうかを最初に確認する必要があります。
ワイルドハントの最小システム要件
CPU:Intel CPU Core i5-2500K 3.3GHz / AMD CPU Phenom II X4 940 RAM:6 GB OS:64ビットWindows 7または64ビットWindows 8(8.1)ビデオカード:Nvidia GPU GeForce GTX 660 / AMD GPU Radeon HD 7870 ピクセルシェーダー:5.0 VERTEXシェーダー:5.0 空きディスク容量:40 GB 専用ビデオRAM:1.5 GB
ワイルドハントの推奨要件
CPU:Intel CPU Core i7 3770 3.4 GHz / AMD CPU AMD FX-8350 4 GHz RAM:8 GB OS:64ビットWindows 7または64ビットWindows 8(8.1)ビデオカード:Nvidia GPU GeForce GTX 770 / AMD GPU Radeon R9 290 ピクセルシェーダー:5.0 バーテックスシェーダ:5.0 空きディスク容量:40ギガバイト専用のビデオRAM:2ギガバイト
ゲームをスムーズにプレイするには、少なくとも推奨システム要件が必要です。
解決策1:ゲームファイルの整合性を確認する
技術的なトラブルシューティング方法を試す前に、まず有効なゲームインストールがあるかどうかを確認します。ゲームファイルが破損しているか、インストールが不完全なケースがいくつかありました。更新プロセスが中断された場合、またはゲームファイルがフォルダー間で移動された場合、ユーザーにこの問題が発生する可能性があります。
このソリューションでは、Steamを開き、組み込み関数を使用してゲームファイルの整合性を検証します。アプリケーションが何かを見つけると、それは置き換えられます。
注:ゲームをプレイするために別のパブリッシングソフトウェアを使用している場合も、同様の手順を実行する必要があります。
- あなたの開きスチームアプリケーションをしてをクリックしてゲームトップバーから。次に、左側の列からウィッチャー3を選択し、右クリックして[ プロパティ ]を選択します。
- [プロパティ]で、[ ローカルファイル ] カテゴリをクリックし、[ ゲームファイルの整合性を検証 ] を選択します。

- ここで、プロセスが完了するまで待ちます。確認が完了したらコンピューターを再起動し、Witcher 3を再度起動します。クラッシュの問題が解決したかどうかを確認します。
解決策2:ゲームの優先度を変更する
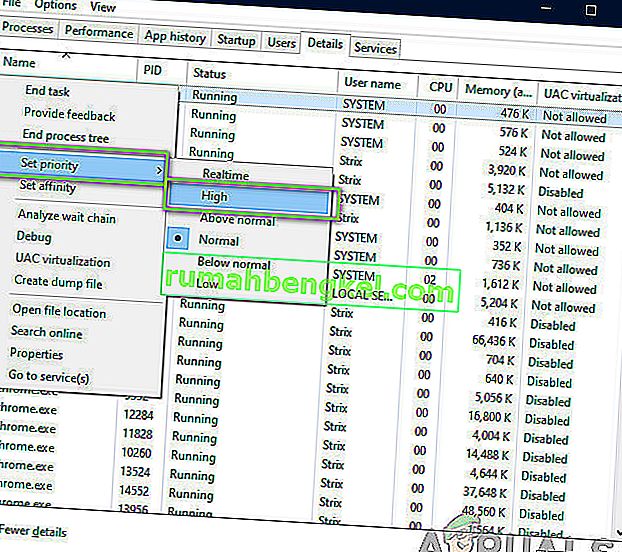
プロセスまたはアプリケーションの優先順位は、コンピュータに重要性と、リソースを割り当てるときに他のプロセスよりも優先されるかどうかを伝えます。デフォルトでは、システムプロセスを除くすべてのアプリケーションの優先順位は通常です。Witcher 3が十分なリソースを取得していない場合は、無期限にクラッシュします。このソリューションでは、タスクマネージャーに移動し、The Witcher 3プロセスを検索して、優先度を高優先度に変更し、これが機能するかどうかを確認します。
- コンピューターでWitcher 3を起動します。ゲームの実行中にデスクトップに移動するには、Windows + Dキーを押します。Windows + R を押し、ダイアログボックスに「taskmgr」と入力してEnterキーを押します。
- 今度は[ 詳細 ]のタブをクリックし、Mordhauのすべてのエントリを見つけます。Witcher3 のプライマリランチャーはSteam なので、その優先度も変更する必要があります。
- 各エントリを右クリックし、設定された優先度にカーソルを合わせて、[ 通常より上]または[ 高 ]に設定します。
- すべてのエントリに対してこれを行います。Alt-tabでゲームに移動し、プレイを開始します。これがクラッシュの問題に何らかの影響を与えたかどうかを確認します。

解決策3:NVIDIA Streamerサービスを無効にする
NVIDIA Streamer service comes bundled with the latest graphics cards released by NVIDIA. It runs as a background service on your computer all the time and comes into play when you are streaming using NVIDIA’s application. We saw that this service conflicted with Wither 3 a lot and cause several issues including the crashing. In this solution, we will navigate to your Services and disable the service manually.
- Press Windows + R, type “services.msc” in the dialogue box and press Enter.
- Once in Services, search for the entry of NVIDIA Streamer Service. Once you locate it, right-click on it and select Properties.
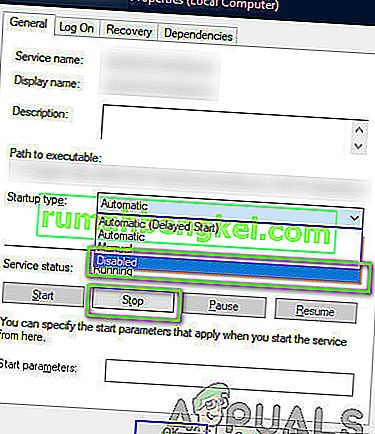
- Once in the properties, click on Stop to stop the service and select startup type as Manual. Save changes and exit.
- Now try launching Witcher 3 and see if the crashing issue is resolved.

Solution 4: Disabling Steam Cloud Saves
The Steam Cloud is a platform which allows games and users to save their progress and data over the Steam cloud so whenever a user logs into the client, the client automatically downloads and updates the progress and preferences. This is a pretty nifty feature which makes Steam more preferable to other engines but is also known to cause several issues.
In this solution, we will navigate to the Steam settings and turn the synchronization off.
- Launch Steam as an administrator and click on Library present at the top.
- Now, all the games will be located at your left-side panel. Locate Witcher 3, right-click on it and select Properties.
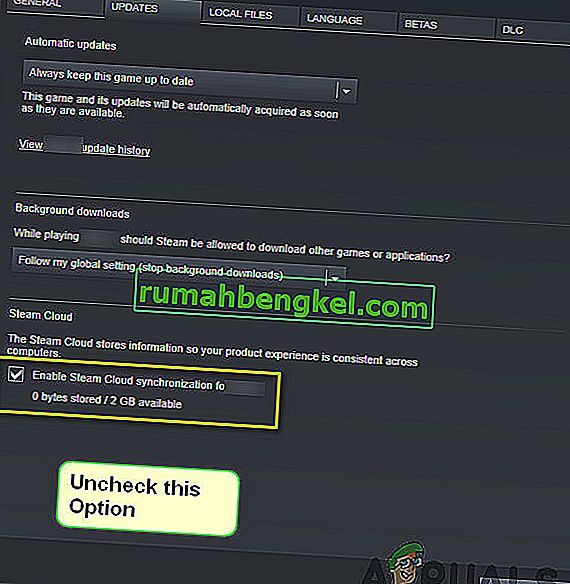
- Once in properties, click on the Updates tab and uncheck the option of Enable Steam Cloud Synchronization.
- Save changes and exit. Restart Steam and launch the game. Check if the issue still occurs.

Solution 5: Disabling VSync
Vsync (Vertical Sync) allows users to synchronize the frame rate of the game with the monitor refresh rate for better stability. This feature is embedded in Witcher 3 and is usually enabled by default. Even though this mechanism is quite nifty, it is known to cause issues with the gameplay and induce crashing.
In this solution, we will navigate to the settings of the game and disable the option.
- Launch Witcher 3 and click on Options from the main menu.
- Now, click on Video and then select Graphics.

- Once in Graphics options, click on VSync and turn the option off.
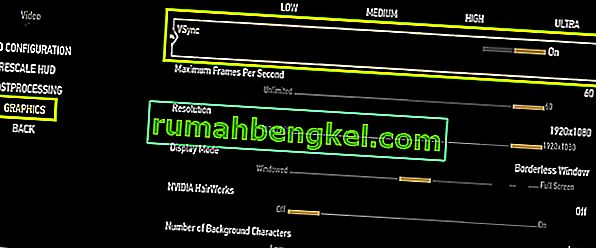


Note: You can also tweak other graphics settings from here if this doesn’t work.
- Save changes and exit. Restart Witcher 3 and see if the issue is resolved.
Solution 6: Disabling Frame Rate Cap
Witcher 3 also provides an in-game option which allows you to set the maximum frame rate. However, even though this allows you to manage your frame rate, it causes issues with the game. In this solution, we will navigate to graphics settings and remove the cap.
- Navigate to Graphics settings using Options in the main menu as we did in the last solution.
- Once in graphics, look for the option of Maximum Frames Per Second. Move the slider to unlimited.
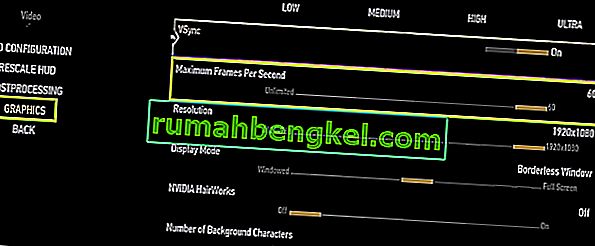
- Restart the game and check if the issue is resolved for good.

Solution 7: Playing in Full Screen
Another thing to try before we jump into more technical methods is changing the game type to Fullscreen. It seems that the borderless window causes more load on the CPU as the Desktop is also running in the background. In this solution, we will navigate to Witcher 3 settings and tweak the changes.
- Navigate to Graphics Settings using Options from the main menu as we did earlier.
- Now, click on Display Mode and set the option to Fullscreen.
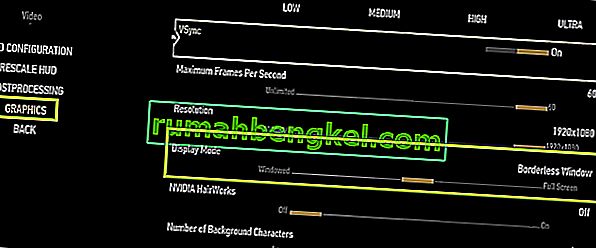
- Save changes and exit. Restart the game and check if the crashing issue is resolved.

Solution 8: Disabling Overclocking
All high-end PC builds nowadays have the option of Overclocking which can help in outputting more juice than what your specifications already have. Overclocking means running the graphics card/processor faster than its default clock speed. When this occurs, the hardware reaches its threshold temperature in a while. The computer detects this and reverts to the normal clock speed until the hardware cools off. When the hardware is cool enough again, the clock speed is increased again.

This act increases your computer’s performance a lot and helps if you don’t have a powerful computer with good processing/graphics capability. The thing to note here is that not all games support overclocking in their mechanisms. The same is the case with Witcher 3. Hence you should try disabling all overclocking on your computer and then try launching the game. If things go well, you will not experience the crashing anymore.
Solution 9: Disabling Mods
Mods are third-party plugins which are meant to enhance the experience of users by changing the graphics a little bit and adding more features than the stock game. This gives players a whole new level of customization to create a better and enjoyable gaming environment. However, since Mods are third-party, they are known to conflict with the game’s very engine and cause several issues.

Also, if the mod’s version and the game’s version are not in sync with each other, the game will crash whenever the mods try to change something in the game. Hence, in this solution, you should try disabling all types of mods on your computer and then see if the issue gets solved. Consider copy-pasting the mod content to another location until we complete the troubleshooting process. After removing the mods, restart your computer and check if the issue is resolved.
Solution 10: Checking for Overheating
Computers often get overheated when they used extensively or when they are performing heavy computations. Similar cases were seen to occur with Witcher 3. It seemed that whenever the computer overheated, the users were given no warning of any such and the game automatically crashed.

Here, you should check your components whether the cooling system is indeed working properly and dust isn’t blocking anything. You can also download temperature checking utilities and measure the temperature when the game is running. Make sure that no components (especially the graphics card) are overheating.
Solution 11: Checking Connectors:
Another thing to try is making sure that the connectors connecting the graphics card, RAM, etc. are properly connected with the hardware. This was a very common occurrence with various users. If the connection is not stable, the data will not be transmitted properly and hence, your game might crash.

You can even try placing the hardware on other connectors and see if this fixes the problem at hand. Press the hardware gently into the connectors to make sure.
Solution 12: Updating Graphics Drivers
If all the above methods don’t work, there is a possibility that you don’t have correct graphics drivers installed on your computer. Drivers are the main components which facilitate the interaction between the game and the hardware. If the drivers are outdated or corrupt, the game might not display correctly and cause lagging. In this solution, we will first remove the current drivers using DDU and then install fresh copies.
- Download and install DDU (Display driver uninstaller) from its official website.
- After installing Display Driver Uninstaller (DDU), launch your computer in safe mode. You can check our article on how to boot your computer into safe mode.
- After launching the DDU, select the first option “Clean and restart”. This will uninstall the current drivers completely from your computer.

- Now after the uninstallation, boot your computer normally without safe mode. Press Windows + R, type “devmgmt.msc” in the dialogue box and press Enter. Right-click on any space and select “Search for hardware changes”. The default drivers will be installed. Try launching the game and check if this solves the problem.
- In the majority of the cases, the default drivers will not work for you so you can either install the latest drivers through Windows update or navigate to your manufacturer’s website and download the latest ones.

- After you have installed the drivers, restart your computer and check if the problem is solved.
Note: Also consider uninstalling NVIDIA GeForce Experience from your computer. This is known to cause issues. Also, we saw several cases where rolling back the driver fixes the problem. Make sure that you try it.