TeamViewerは、ビデオチャットやリモートコントロールに役立つプログラムであり、ゲーマーやリモートITアシスタンスで非常に人気のある選択肢です。ただし、多くのユーザーは、単に接続できないと報告しています。画面下部の赤いライトの横に、問題のあるエラーメッセージが表示されます。

問題を解決するために使用できる方法はいくつかあります。以下でそれらを確認することをお勧めします。これらは通常、実行が非常に簡単で、問題を瞬時に解決できます。
WindowsでTeamViewerの「接続の準備ができていません」のエラーの原因は何ですか?
この特定の問題にはさまざまな原因があり、リストのすべてのメソッドを試したくない場合は、正しい問題を特定することが重要な場合があります。これにより、解決策がより早くわかります。そのため、以下にある考えられるすべての原因のリストを作成することにしました。
- 「hosts」ファイルの誤った設定 –「hosts」ファイルには、インターネットに接続するアプリに関する重要な情報が含まれており、TeamViewerのエントリが破損している可能性があります。そのエントリを削除すると、Windowsによってエントリが再作成されるため、問題を解決してみてください。
- ウイルス対策またはファイアウォールの問題 –実行しているファイアウォールまたはウイルス対策によってTeamViewerのインターネットへのアクセスが妨げられている場合は、メインの実行可能ファイルを例外としてください。
- DNSおよびWinsockの問題 – DNSアドレスを変更したり、Winsockをリセットしたりできます。多くのユーザーにとって、これは問題を解決するために必要なすべてのことなので、必ず試してください!
- IPv6接続 – TeamViewerは単にIPv6で動作しない場合があるため、この問題を解決するために無効にすることを検討してください。痛くないし、TeamViewerを復活させるかもしれません!
- TeamViewerの新しいインターフェース –ユーザーインターフェースは、接続性の問題に関連するものではありませんが、TeamViewerのいくつかのユーザーにとっては確かにそうでした。それらの問題を解決するために管理された古いインターフェースに戻す。
解決策1:HostsファイルからTeamViewerを削除する
コンピューターの「ホスト」ファイルのTeamViewerエントリが破損している可能性が高いです。完全に間違っているアドレスとデータが表示される場合があるため、そのエントリを削除することをお勧めします。もう一度開くと、エントリが再作成され、問題が発生しなくなることが期待されます。
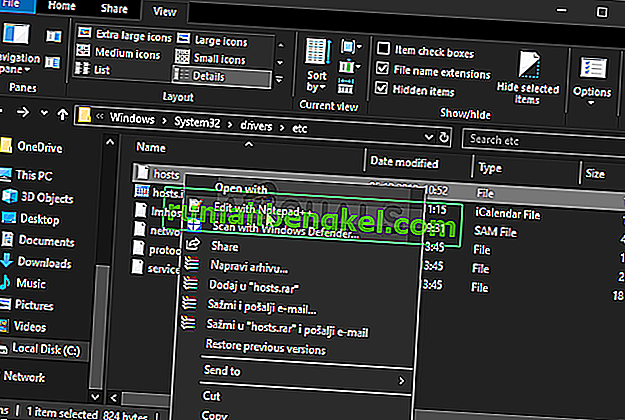
- ファイルエクスプローラーを開いた後、C >> Windows >> System32 >> Drivers >>などに移動します。まず、左側のペインから[ このPCまたはマイコンピュータ ]をクリックして、ローカルディスクCを見つけて開きます。
- Windowsフォルダーを表示できない場合は、非表示のファイルとフォルダーを表示するオプションをオンにする必要がある場合があります。ファイルエクスプローラーのトップメニューの[ 表示 ]タブをクリックし、ファイルエクスプローラーの表示/非表示の [ 非表示のアイテム ] チェックボックスをクリックすると、非表示のファイルが表示され、再度変更するまでこの設定が記憶されます。

- Etcフォルダーでhostsファイルを見つけて右クリックし、[ メモ帳で開く ]を選択します。Ctrl + Fキーの組み合わせを使用し、[ 次を検索 ]をクリックする前に、[ 検索する文字列]ボックスに「teamviewer」と入力してください。
- ファイルでTeamViewerセクションを見つけます。それは「#Teamviewer」で始まり、それに属しているすべてのものを選択していることを確認し、選択を右クリックして、コンテキストメニューから[削除]ボタンを選択します。
- [ ファイル] >> [保存]をクリックして変更を保存するか、Ctrl + Sキーの組み合わせを使用します。メモ帳を終了し、コンピュータを再起動します。TeamViewer「準備ができていません。」に関して問題が解決しないかどうかを確認してください。接続を確認してください」というエラーメッセージが表示されます。
解決策2:DNSアドレスを変更する
ユーザーは、ISP(インターネットサービスプロバイダー)から提供されたDNSを変更し、別のDNSの使用を開始するだけで問題を解決できたと述べています。問題が発生しないコンピューターのDNSでもかまいませんが、多くのユーザーはGoogleのDNSを使用して問題を解決しました。以下の手順に従って、コンピュータのDNSアドレスを変更してください!
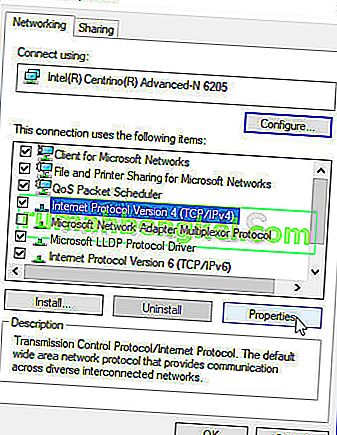
- Windows + Rキーの組み合わせを使用すると、Runユーティリティボックスが開きます。テキストボックスに「ncpa.cpl」と入力し、[OK]をクリックして、コントロールパネルの[インターネット接続設定]エントリを開きます。
- 同じことは、コントロールパネルを手動で開くだけで実行できます。ウィンドウの右上のセクションにある[表示方法 ]オプションを[ カテゴリ ]に切り替え、上部にある[ ネットワークとインターネット ]をクリックします。左側のメニューで[ アダプターの設定の変更 ]ボタンを見つけてクリックする前に、[ ネットワークと共有センター ]ボタンをクリックして開きます。
- 上記の方法でインターネット接続画面が開いたら、アクティブなネットワークアダプター(インターネットへの接続に使用しているアダプター)をダブルクリックし、現在のユーザーアカウントの管理者権限がある場合は、下の[ プロパティ ]ボタンをクリックします。
- リストから[ インターネットプロトコルバージョン4(TCP / IPv4)]を見つけます。それをクリックして選択し、下の[ プロパティ ]ボタンをクリックします。
- 滞在全般 ]タブとのラジオボタンを変更プロパティ「ウィンドウに次のDNSサーバーのアドレスを使うことは、他のオプションに設定されている場合」。
- どちらの方法でも、優先DNSサーバーを8.8.8.8に設定し、代替DNSサーバーを8.8.4.4に設定します。
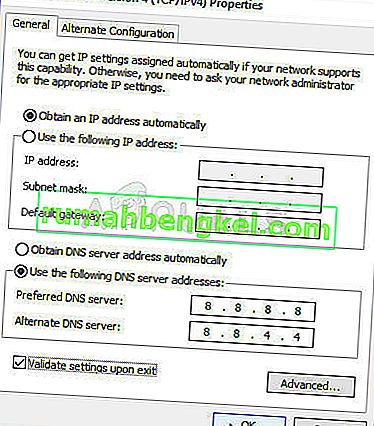
- 「キープ終了時に検証の設定」オプションがチェックされ、すぐに変更を適用するには、[OK]をクリックします。TeamViewerが「準備ができていません。「接続を確認してください」というエラーメッセージがまだコンピュータに表示されます。


解決策3:Winsockをリセットする
「netsh Winsock reset」は、コマンドプロンプトでWinsockカタログをデフォルトの設定またはクリーンな状態にリセットするために使用できる便利なコマンドです。TeamViewerで接続できない場合は、この方法を試すことができます。
- [コマンドプロンプト]を検索するには、スタートメニューに直接入力するか、その横にある検索ボタンを押します。検索結果としてポップアップする最初のエントリを右クリックし、[ 管理者として実行 ]コンテキストメニューエントリを選択します。
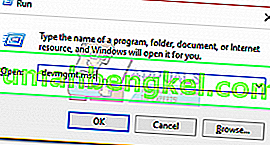
- さらに、Windowsロゴキー+ Rキーの組み合わせを使用して、[ファイル名を指定して実行]ダイアログボックスを表示することもできます。表示されるダイアログボックスに「cmd」と入力し、Ctrl + Shift + Enterキーの組み合わせを使用して、管理者権限でコマンドプロンプトを実行します。

- ウィンドウに次のコマンドを入力し、それぞれを入力した後にEnterキーを押してください。「Winsockのリセットが正常に完了しました」というメッセージまたは同様のメッセージが表示されるのを待ち、メソッドが機能し、入力中に間違いがなかったことを確認します。問題が解決しないかどうかを確認します。

netsh winsock reset netsh int ip reset

解決策4:新しいユーザーインターフェイスを使用しない
User interface shouldn’t be in any way connected to TeamViewer’s internet connection but, weirdly enough, many users have reported that they were able to resolve this issue simply by reverting to the program’s old design. This can be done in TeamViewer’s settings so make sure you follow the steps below and try to resolve this connectivity issue.
- Open TeamViewer by double-clicking its icon from Desktop or by searching for it after opening the Start menu and left-clicking the top result.
- From the home screen, click the Extras button from the menu bar and choose the Options entry from the list which will appear.
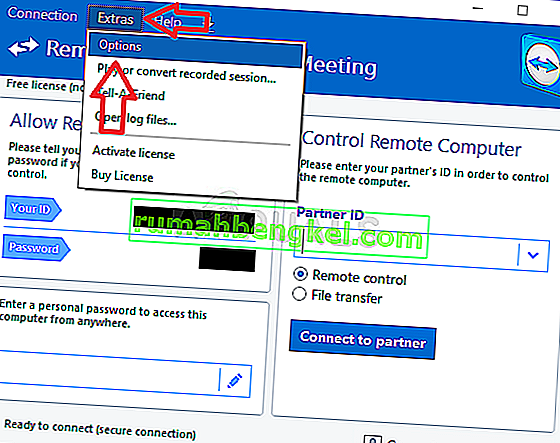
- Navigate to the Advanced tab in TeamViewer options from the left-side navigation menu and check under General Advanced Settings for the “Use new user interface” option. Make sure you uncheck the box next to it before confirming the changes you have made.
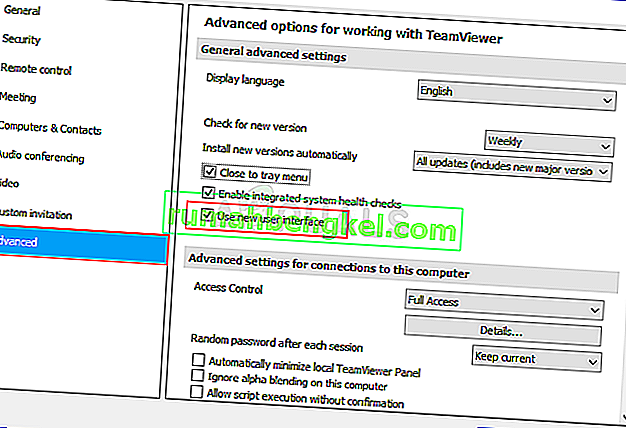
- Reopen TeamViewer and check to see if the TeamViewer “Not ready. Check your connection” error message still appears on your computer!


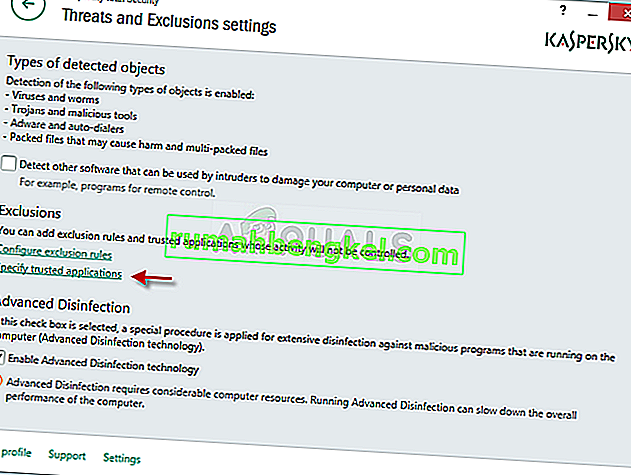
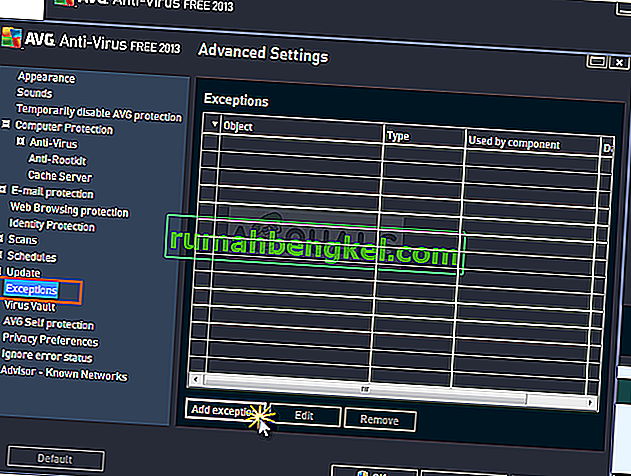
Solution 5: Add an Exception for the Teamviewer_Service.exe File
Sometimes antivirus tools fail to recognize the program’s efforts to connect to the Internet as harmless and TeamViewer’s features are often blocked by it. To prove to the antivirus that the program is harmless, you will have to add it to its Exceptions/Exclusions list!
- Open the antivirus user interface by double-clicking on its icon at the system tray (right part of the taskbar at the bottom of the window) or by searching for it in the Start menu.
- The Exceptions or Exclusions setting is located in different spots concerning different antivirus tools. It can often be found simply without much hassle but here are some quick guides on how to find it in the most popular antivirus tools:
Kaspersky Internet Security: Home >> Settings >> Additional >> Threats and Exclusions >> Exclusions >> Specify Trusted Applications >> Add.
AVG: Home >> Settings >> Components >> Web Shield >> Exceptions.
Avast : Home >> Settings >> General >> Exclusions
- You will need to add the Teamviewer_Service.exe executable in the box which will appear prompting you to navigate to the folder. It should be in the same folder where you decided to install TeamViewer in. By default, it’s:
C:\Program Files (x86)\TeamViewer
- Check to see if you are now able to use TeamViewer without receiving the problematic error message. If it still won’t work, try restarting your computer and try again. The last step would be to uninstall the antivirus and try a different one if the problem persists.


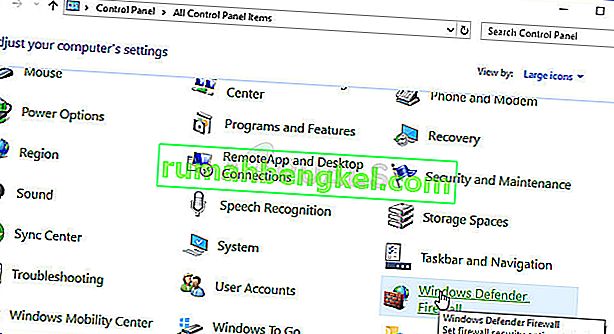
Solution 6: Allow it in Windows Defender Firewall
For TeamViewer’s features to work properly, the app needs to have uninterrupted access to the Internet and its servers to work properly. Windows Defender Firewall is often to blame in such cases and we recommend you make an exception for the Teamviewer_Service.exe executable inside the Windows Defender Firewall!
- Open up Control Panel by searching for the utility in the Start button or by clicking the Search button or the Cortana button at the left part of your taskbar (bottom left part of your screen).
- After Control Panel opens, change the view to Large or Small icons and navigate to the bottom to open the Windows Defender Firewall option.
- Click on Windows Defender Firewall and click on the Allow an app or feature through Windows Firewall option from the left side list of options. A list of installed apps should open. Click the Change settings button at the top of the screen and provide administrator permissions. Try locating the executable inside. If it’s not there, click the Allow another app button below.
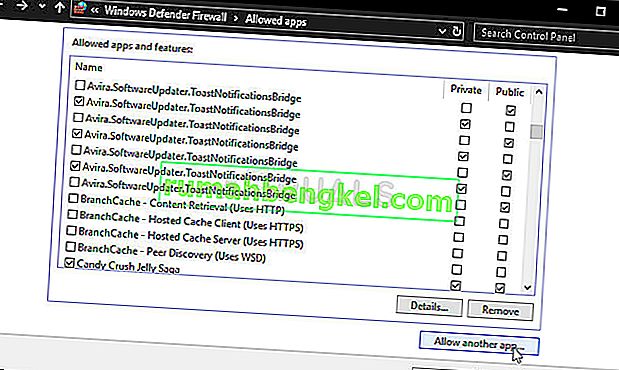
- Navigate to where you installed TeamViewer (C:\Program Files (x86)\TeamViewer by default) and choose the Teamviewer_Service.exe file.
- After locating it, click the Network types button at the top and make sure you check the boxes next to both Private and Public entries before clicking OK >> Add.
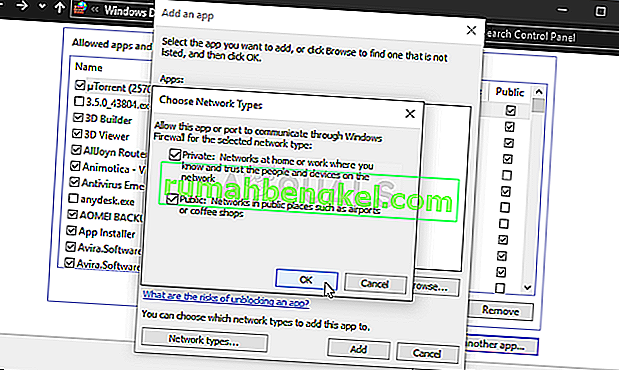
- Click OK and restart your computer before checking whether the TeamViewer “Not ready. Check your connection” error message still appears on your computer.


Solution 7: Disable IPv6
Disabling Internet Protocol version 6 connectivity on your computer managed to resolve the problem for many users and it’s an easy way to resolve the problem. This makes this method worthy and you shouldn’t skip it during your troubleshooting process.
- Use the Windows + R key combo which should immediately open the Run dialog box where you should type ‘ncpa.cpl’ in the bar and click OK to open the Internet Connection settings item in Control Panel.
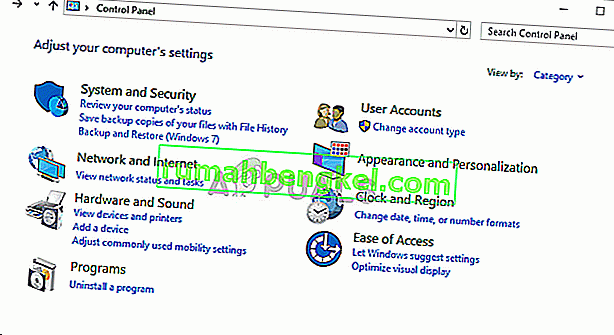
- The same process can also be done by manually opening the Control Panel. Switch the View by setting at the top right section of the window to Category and click on Network and Internet at the top. Click the Network and Sharing center button to open it. Try to locate the Change adapter settings button at the left menu and click on it.

- When the Internet Connection window opens, double-click on your active Network Adapter.
- Then click Properties and locate the Internet Protocol Version 6 entry on the list. Disable the checkbox next to this entry and click OK. Restart your computer to confirm the changes and check to see if the problem persists.


Solution 8: Restart the TeamViewer Service
Stopping the TeamViewer service from running will effectively restart the whole process and many users have reported that it only took them a few minutes to get TeamViewer to work again. Before starting, make sure you have closed TeamViewer completely.
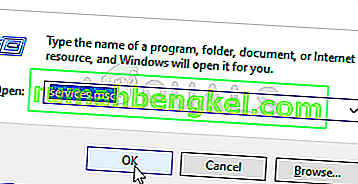
- Open the Run utility by using the Windows Key + R key combination on your keyboard (press these keys at the same time. Type “services.msc” in the newly opened box without the quotation marks and click OK to open the Services tool.
- The alternative way is to open the Control Panel by locating it in the Start menu. You can also search for it using the Start menu’s search button.
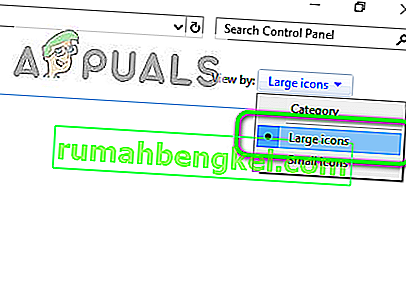
- After the Control Panel window opens, change the “View by” option at the top right part of the window to “Large Icons” and scroll down until you locate the Administrative Tools entry. Click on it and locate the Services shortcut at the bottom. Click on it to open it as well.
- Locate the TeamViewer Service on the list, right-click on it and select Properties from the context menu which appears.
- If the service is started (you can check that just next to the Service status message), you should stop it for now by clicking the Stop button in the middle of the window. If it is stopped, leave it stopped until we proceed.
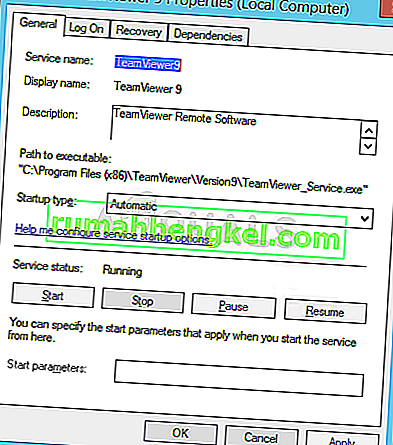
- Make sure that the option under the Startup type menu in the service’s properties window is set to Automatic before you proceed with other steps. Confirm any dialogue boxes which may appear when changing the startup type. Click on the Start button in the middle of the window before exiting.


Solution 9: Reinstall TeamViewer
If all methods above fail to work, reinstalling TeamViewer is the last method which can help you resolve the problem on your computer. It should be fast and painless if you follow all the steps properly! You will also install the latest version which contains the patch to the specific issue you are having!
- Click the Start menu and open Control Panel by searching for it simply by typing with the Start menu window open. Alternatively, you can click the cog icon in the lower-left part of the Start menu to open the Settings app if you are using Windows 10.

- In Control Panel, select the View as: Category option at the top right corner of the Control Panel window and click on Uninstall a Program under the Programs section.
- If you are using the Settings app, clicking on Apps should immediately open a list of all installed programs on your PC so wait for a while for it to load
- Locate TeamViewer in Control Panel or Settings and click on Uninstall/Repair. Follow any instructions which appear afterward to uninstall it completely.
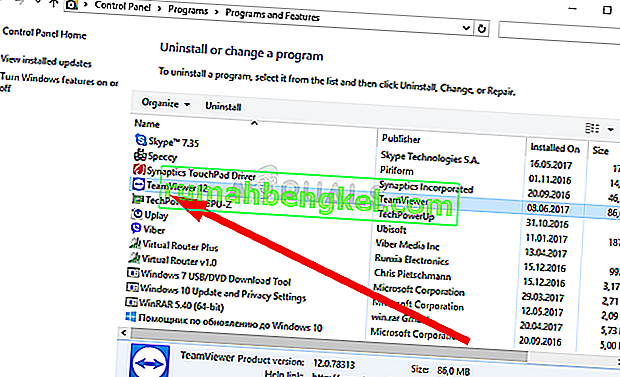
- Download the latest version of TeamViewer by visiting this link. Download its setup file, run it from the Downloads folder, follow the instructions on screen, and check to see if the problem persists after reinstalling TeamViewer!